Author: admin

  • How to set up email in Outlook.com

    This guide takes you step-by-step through the process of setting up your Texo-hosted hosted email account using the online Outlook.com mail client.

    • For Outlook 2016, Outlook 2013, Outlook 2010 or Outlook for Mac, refer to those specific guides.
    • Replace example.com with your domain name.
    • Check your password by browsing to Webmail and trying to log in. If you aren’t able to log in, then you have the incorrect password. Forgotten passwords can be reset in your control panel – you will need to get your domain or web administrator to update it for you if you don’t have control panel access.

    Set up your email account

    1. Browse to https://outlook.live.com to launch Outlook.com
    2. At top right, select the Settings (cog) icon

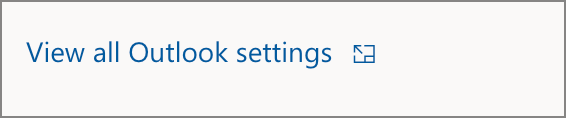
    3. Scroll to the bottom of the tab and click on View all Outlook settings 
    4. Select Sync email and then Other email accounts
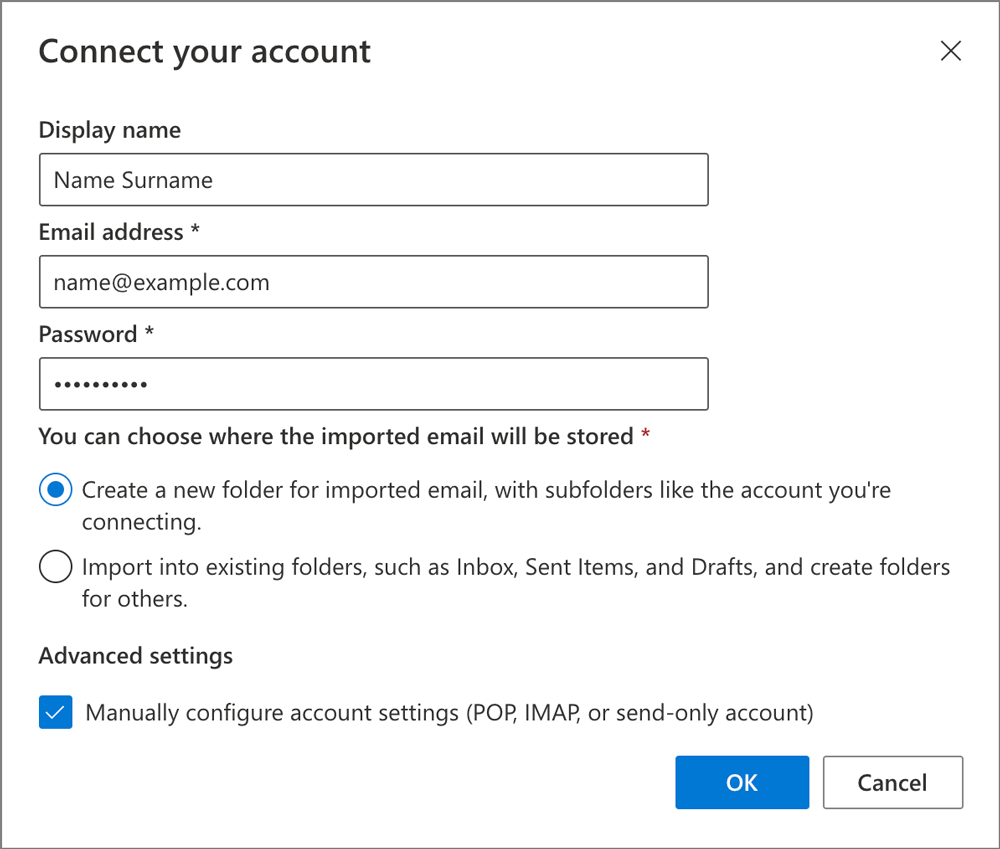
    5. Under Connect your account
      • Fill in your name, email address and password
      • Select either storage location
      • Tick Manually configure account settings
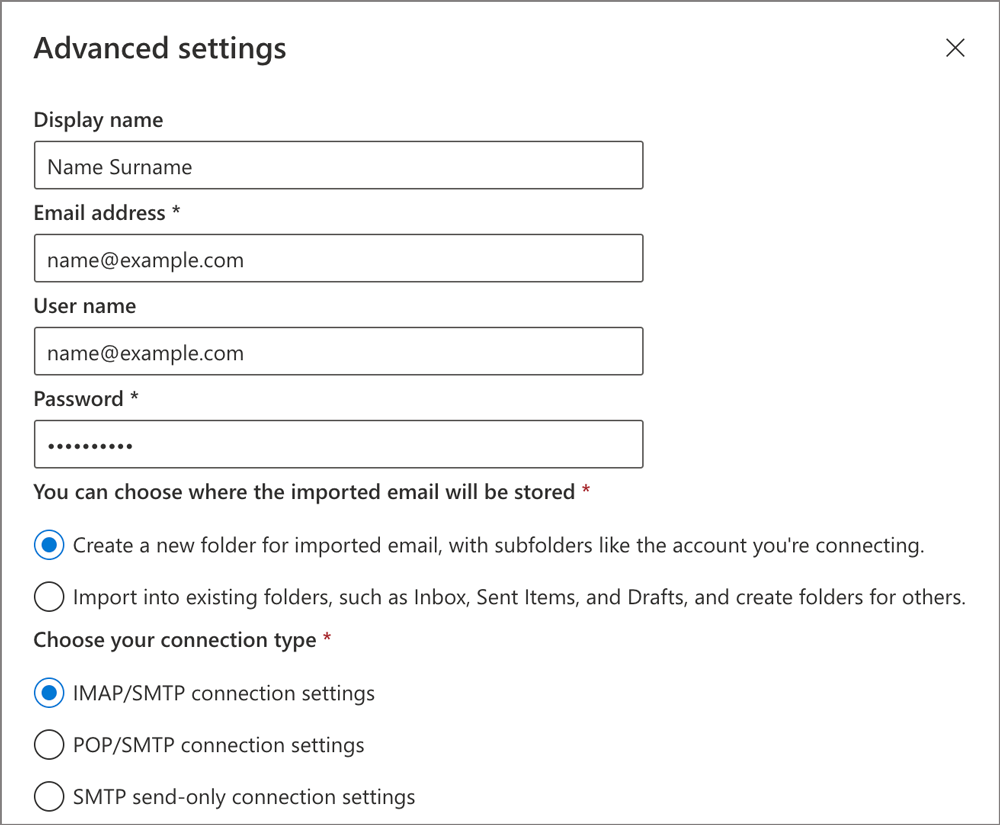
    6. Under Advanced settings
      • ensure that your user name is your full email address
      • select either IMAP/SMTP or POP/SMTP connection settings (Help me choose)
    7. Further down the page, complete the settings, making sure that:
      • Incoming server is mail. followed by your domain name e.g. mail.example.com*
      • Incoming server port is 993 (IMAP) or 995 (POP)
      • Authentication is set to Basic
      • Encryption is set to SSL
      • Send email using your provider’s server is ticked
      • Outgoing SMTP server is mail. followed by your domain name e.g. mail.example.com*
      • Outgoing server port is 465
      • Click OK

    8. The setup is complete and your mail will be imported from the server.
  • How to set up your email in Gmail for mobile

    This guide takes you step-by-step through the process of setting up a new email account in Gmail on your cell phone or tablet.

    To setup your email on a laptop or computer, see How to setup your domain email in Gmail

    Replace example.com with your domain name.

    Check your password

    • First, check your password by browsing to Webmail and trying to log in. If you aren’t able to log in, then you have the incorrect password. Forgotten passwords can be reset in your Control Panel – you will need to get your domain or web administrator to update it for you if you don’t have Control Panel access.

    Add your mail account

    1. Open Gmail on your mobile device. If this is your first mail account to be setup, skip to step 4
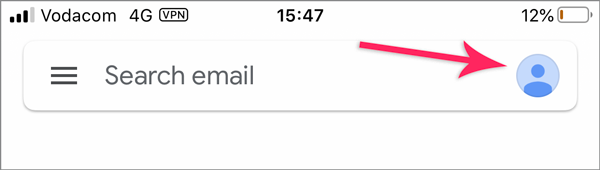
    2. Tap the profile pic at the top right of the screen

    3. Tap Add another account

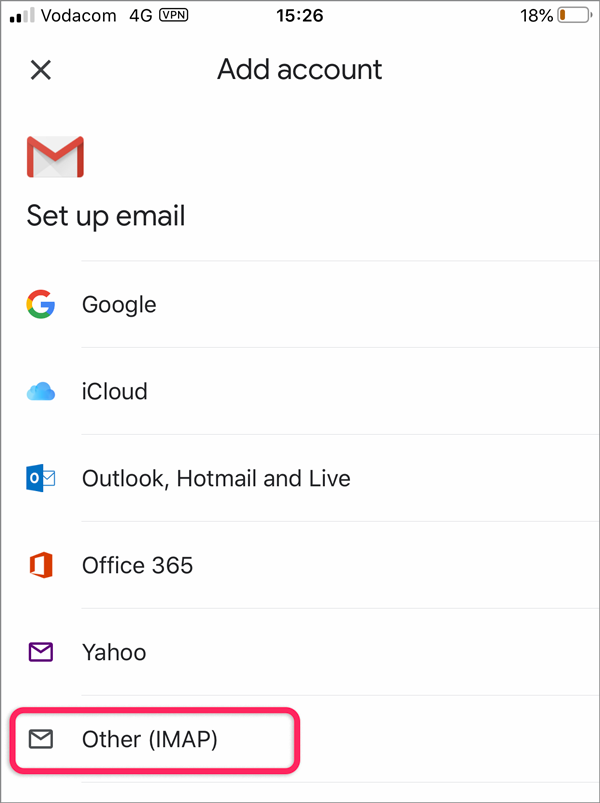
    4. On the Add Account screen, select Other at the bottom

    5. Type in the email address that you want set up and then tap Next

    6. Gmail will now try to connect

    7. Incoming mail server
      • User name: the full email address
      • Password: your mail account password
      • IMAP server: mail.  followed by your domain name e.g. mail.example.com*
      • Port: 993
      • Security type: SSL/TLS

      • Tap Next at the top right of your screen
    8. Outgoing server settings
      • User name: the full email address
      • Password: your mail account password – the same as step 7
      • SMTP server: smtp. followed by your domain name e.g. smtp.example.com
      • Port: 465
      • Security type: SSL/TLS

      • Tap Next
    9. The account settings will be tested and you will then receive a success message.
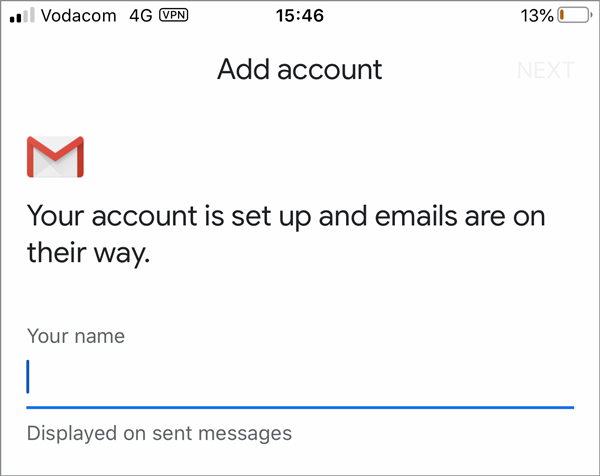
    10. Add your name as you would like it to appear on your sent mail

  • How to set up email in Outlook Mobile

    This guide takes you step-by-step through the process of setting up a new email account in the Outlook Mobile app on iOS or Android.

    Replace example.com with your domain name

    Note: The following screenshots are from the Outlook app on an iPhone – Android mobiles have the same functionality but looks may differ.

    1. Launch the Outlook app
    2. If this is the first account to be setup, skip to step 3. If you have other accounts set up, then you need to access the Add Account menu:
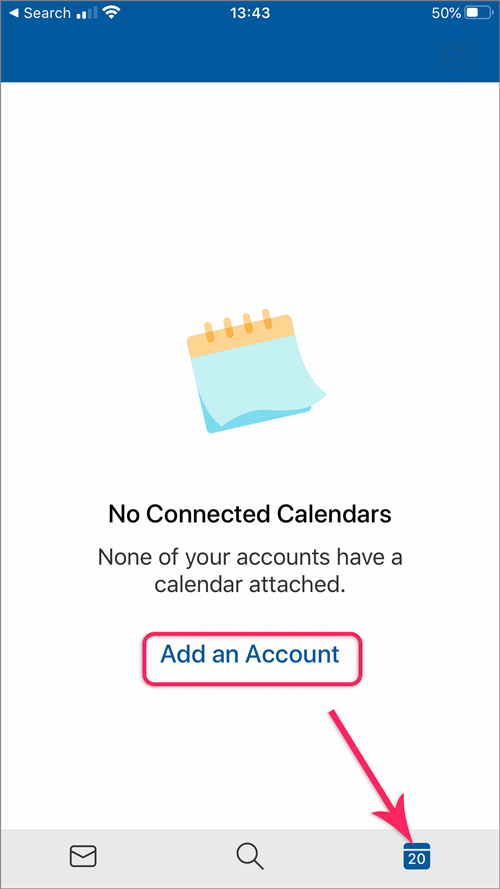
      • Select the calendar at the bottom of your screen, then Add Account, or
      • Select your profile icon to access the menu, then select the Settings icon (cog), then Add Email Account

    3. An Add Account screen will appear; enter your email address and select Add Account or Continue – depending on your version

    4. Now select Set Up Account Manually

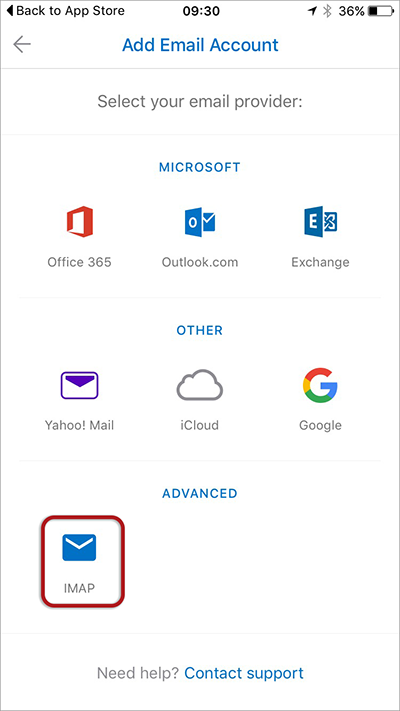
    5. Select IMAP under the Advanced setting

      add-mail

    6. Complete the following fields:
      ° Email address – type in your full email address (in lowercase)
      ° Password – type your email password (forgotten passwords can be reset in your Control Panel)
      ° Display name – Your full name (eg John Smith)
    7. Complete all Advanced Settings
      • IMAP Incoming Mail Server – mail. followed by your domain name e.g. mail.example.com*
      • IMAP Username is the full email address
      • IMAP Password is the mailbox password
      • SMTP Outgoing Mail Server – mail. followed by your domain name e.g. mail.example.com*
      • SMTP Username is the full email address (same as IMAP)
      • SMTP Password is the mailbox password (same as IMAP)
    8. Select either the Sign In button or the tick at top right – depending on your version

    9. The next screen – Account added – will confirm that the email account has been added successfully
    10. If you would like to add another email account, select Continue. If not, select Skip
    11. An email tutorial will appear; by selecting Skip you will be taken directed to your inbox. Alternatively, your inbox will appear after the tutorial.
  • How to set up email on Android

    This guide takes you step-by-step through the process of setting up a new email account on Android.

    Replace example.com with your domain name

    Launch your mail application

    1. Start by selecting the mail icon from your applications screen

    iconhtc-mail-iconsony-mail-iconlg-email-icon

    Setup email

    2. Enter the email address and email password

    • forgotten passwords can be reset in your control panel
    • Choose  Manual Setup

    samsung-set-up-email

    Account type

    3. Choose POP or IMAP (default)

    samsung-account-type

    Incoming server settings

    4. The programme may try to connect to the server, but will fail – you will need to add the full email address as User Name.

    Check the other settings:

    • POP/IMAP server is mail. followed by the domain name e.g. mail.example.com*
    • Security type is SSL/TLS
    • Port is 993 for IMAP or 995 for POP
    • select Next

    Outgoing server settings

    5. Enter all the relevant details as in the screen below

    • SMTP server is mail. followed by the domain name e.g. mail.example.com*
    • Security type is SSL/TLS
    • Port is 465
    • select Next

    Checking outgoing server settings…

    6. Wait while your settings are tested

    Account options

    7. Adjust the additional Account Options as preferred.

    Name

    8. Specify an optional account name (for your reference only), and enter the name you wish to be displayed on outgoing mail, then select Done.

    samsung-done

    Complete Setup

    9. The account has been set up successfully and your messages will now be downloaded.

  • How to set up email on iPhone & iPad

    Add Mail Account

      1. Select the settings icon on your home screen

        iphone settings icon

      2. Select Mail
      3. Select Accounts
      4. Select Add Account
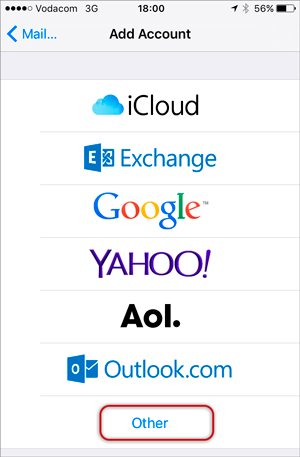
      5. Select Other from the menu

        iphone-other

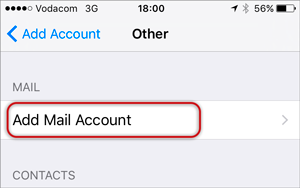
      6. Select Add Mail Account

    iphone-other-add-mail

    Enter your account information

    Enter your Name, Email & Password > Next

      • Forgotten passwords can be reset in your Control Panel

    Configure Incoming and Outgoing Servers

    Select IMAP (default) or POP according to your needs (See POP vs IMAP)

      1. Scroll down to Incoming Mail Server and enter all the relevant details, then do the same for Outgoing Mail Server, as in the screen below and then select Next.
        • Host Name:
          • Incoming mail server: has mail. before the domain name e.g. mail.example.com*
          • Outgoing mail server:  has mail. before the domain name e.g. mail.example.com*
          • Ensure that User Name is the full email address
        • User Name & Password are the same for both Incoming & Outgoing servers

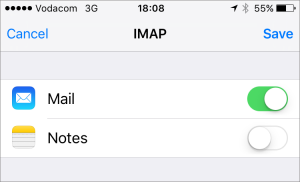
    Click Save

    iphone mail notes

    You have completed your account setup.

    Congratulations! You have now successfully configured your email account on your iPhone.

  • Outlook for Mac (Microsoft 365)

    This guide takes you step-by-step through the process of setting up a new email account in Microsoft 365’s Outlook for Mac.

    Replace example.com with your domain name.

    Add your mail account

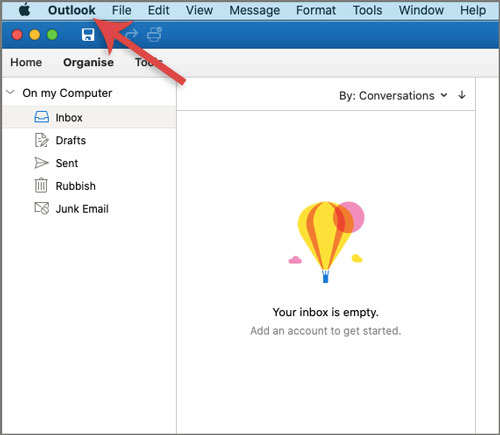
    1. Launch Outlook
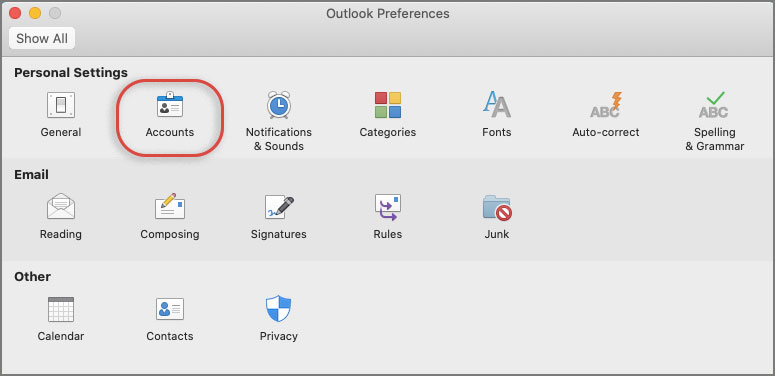
    2. Select the Outlook tab, then Preferences and then Accounts
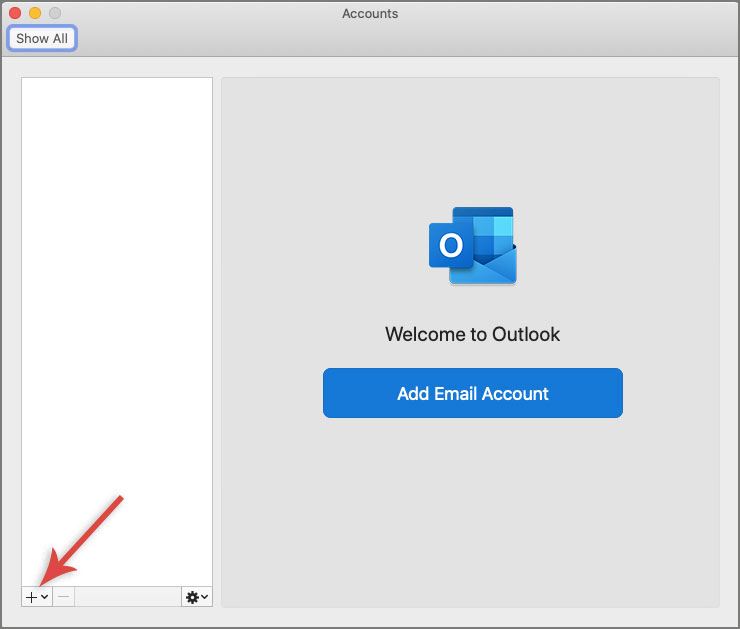
    3. A new window will open which will list any other accounts already set up
    4. If there are no accounts listed, click the Add Email Account button. If there are already accounts, click the ‘+‘ button at bottom left and then Add New Account…
    5. Enter your email address then click Continue
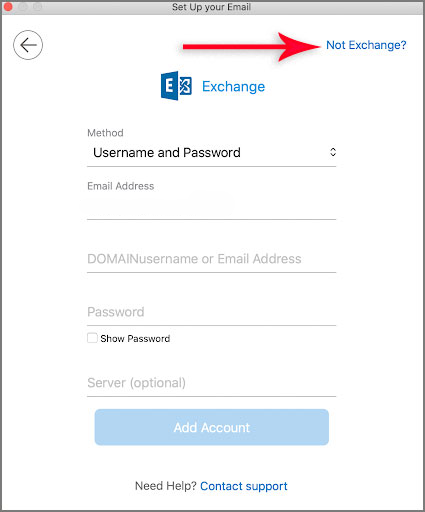
    6. On the next window, be mindful of Microsoft 365 defaulting to Exchange. Select Not Exchange at top right to deselect this as we do not support exchange mailing on our hosting environment.
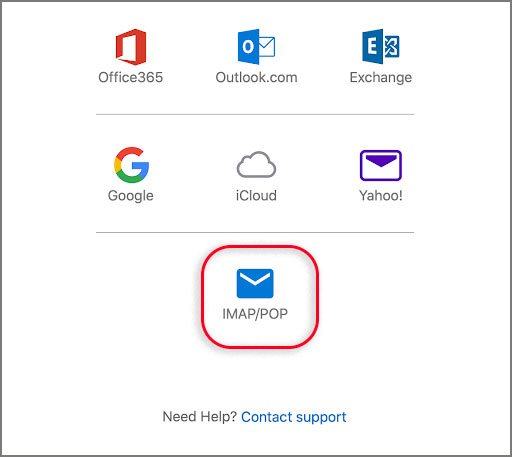
    7. Select POP/IMAP
    8. Enter the settings relevant to your mail account
      • POP or IMAP (choose IMAP if you want to access your mail on more than one device e.g. laptop and cell phone)
      • Email address and User name are both your full email address eg. john@example.com
      • Incoming Server name: mail. followed by your domain name e.g. mail.example.com*
      • Incoming server Port: 993 (IMAP) or 995 (POP)
      • Outgoing Server: mail. followed by your domain name e.g. mail.example.com*
      • Outgoing server Port: 465
      • Select  Use SSL
    9. Click the Add Account button.
  • How to set up email in Outlook 2011 for Mac

    How to set up email in Outlook 2011 for Mac

    User Name :
    Your user name is your full email address
    Incoming Server : mail.yourdomain.co.za
    Ports : IMAP 993 / POP 995
    Outgoing Server : mail.yourdomain.co.za
    Port : SMTP 465
    Encryption: SSL/TLS

    Replace example.com with your domain name

    Check your password

    • First, check your password by browsing to Webmail and trying to log in. If you aren’t able to log in, then you have the incorrect password. Forgotten passwords can be reset in your control panel – you will need to get your domain or web administrator to update it for you if you don’t have control panel access.

    Add Account

    1. Launch Outlook for Mac
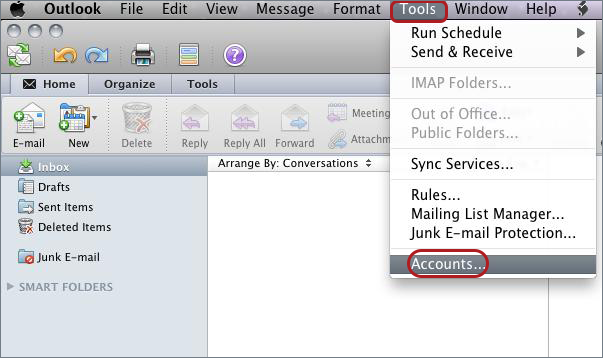
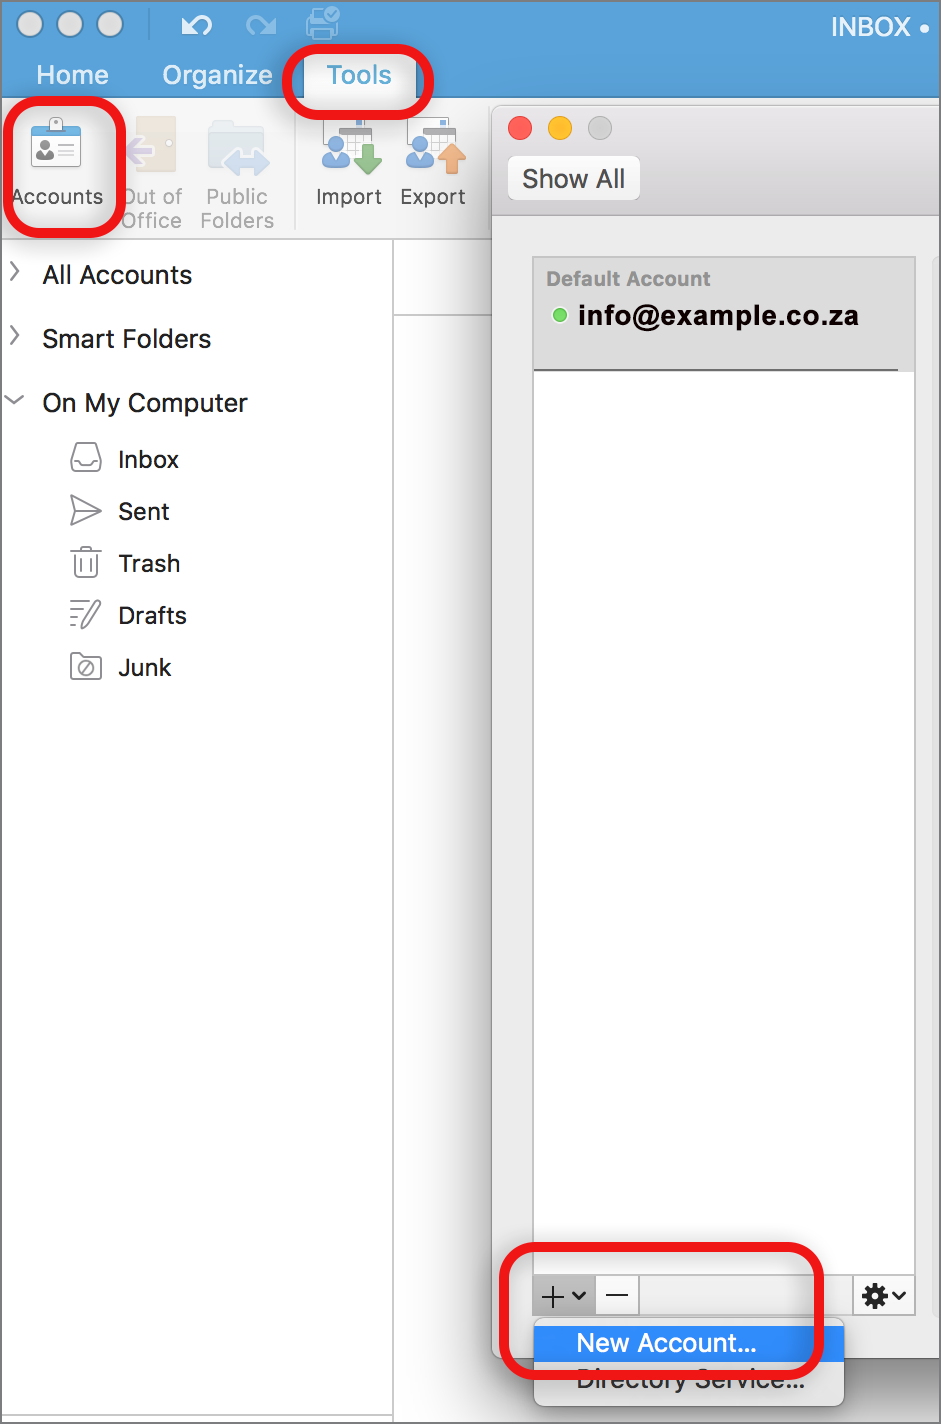
    2. Select Tools from the top menu bar and then Accounts… 

      Outlook Mac email setup

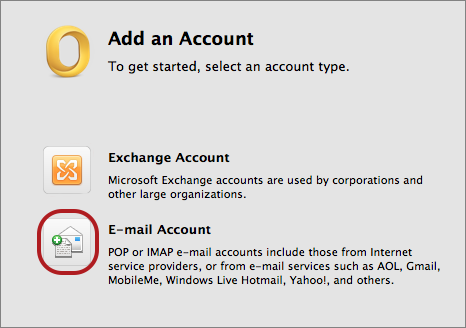
      Add an Account

    3. Select the E-mail Account optionoutlook mac-add-account

      Enter your account information

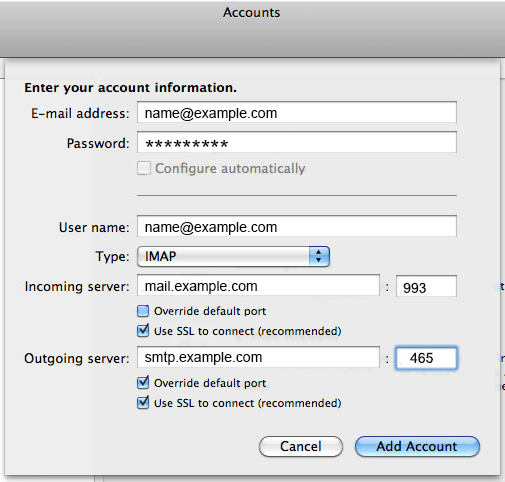
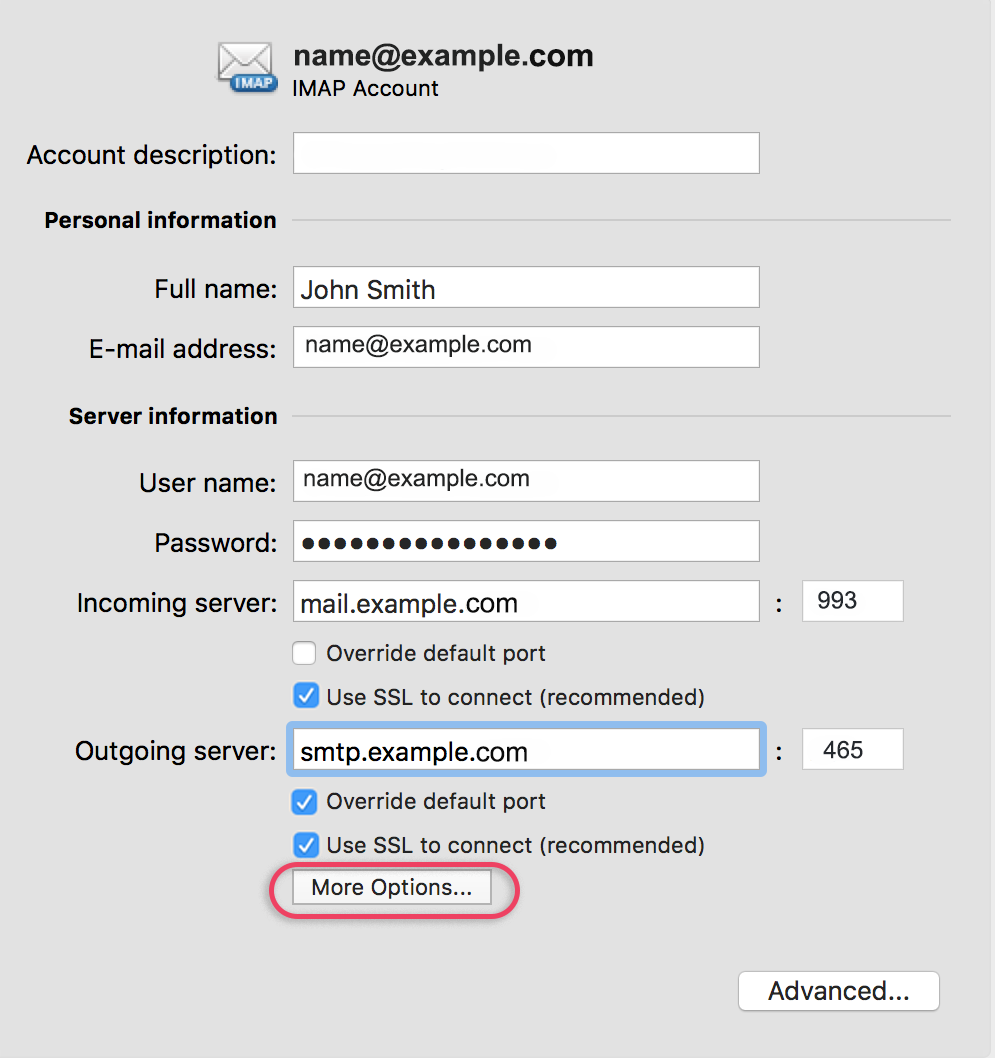
    4. Enter all the relevant details:
      • If you don’t know your password, reset it in your control panel.
      • Ensure that the User Name is the full email address in lower case.
      • Choose IMAP or POP according to your preference.
      • Incoming server: add mail. before your domain name e.g. mail.example.com*
      • tick Use SSL to connect
      • Port  is 993 for IMAP or 995 for POP
      • Outgoing server: add mail. before your domain name
      • Port is 465 (you may need to click “override default port” to change this)
      • Tick Use SSL to connect
    5. Click Add Account

    6. All settings should be correct on this screen – choose More Options
      • Note: If there is an option “Always use secure password”, this should remain unticked

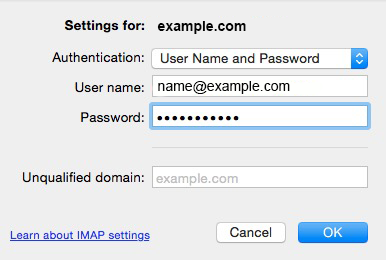
    7. Settings for SMTP server:
      Select User Name and Password for Authentication
    8. Enter in your User name (full email address) and password then select OK 

      outlook mac smtp

    * Note: In isolated cases mail.domain (e.g. mail.example.com) won’t work. In these cases you will need to use the server name instead

    You have completed your account setup

    Your Outlook mail program should now be set up to send and receive mail.

  • How to set up email in Outlook 2016 for Mac

    How to set up email in Outlook 2016 for Mac

    User Name :
    Your user name is your full email address
    Incoming Server : mail.yourdomain.co.za
    Ports : IMAP 993 / POP 995
    Outgoing Server : mail.yourdomain.co.za
    Port : SMTP 465
    Encryption: SSL/TLS

    Replace example.com with your domain name

    Check your password

    • First, check your password by browsing to Webmail and trying to log in. If you aren’t able to log in, then you have the incorrect password. Forgotten passwords can be reset in your control panel – you will need to get your domain or web administrator to update it for you if you don’t have control panel access.

    Add your mail account

      1. Launch Outlook for Mac
      2. Select the Tools tab and then Accounts
      3. A new window will open which will list any other accounts already set up
      4. At the bottom left, Click the ‘+‘ button and then New Account…
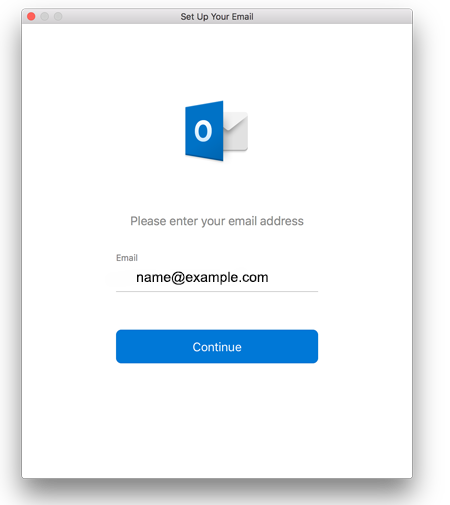
      5. Add your email address and click Continue
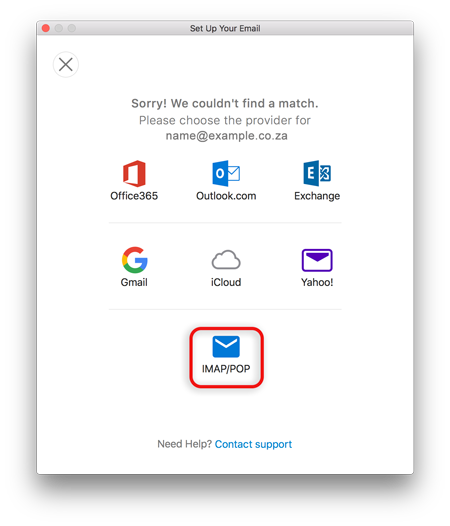
      6. The programme will unsuccessfully search for the provider. Select IMAP/POP

        Enter your account information

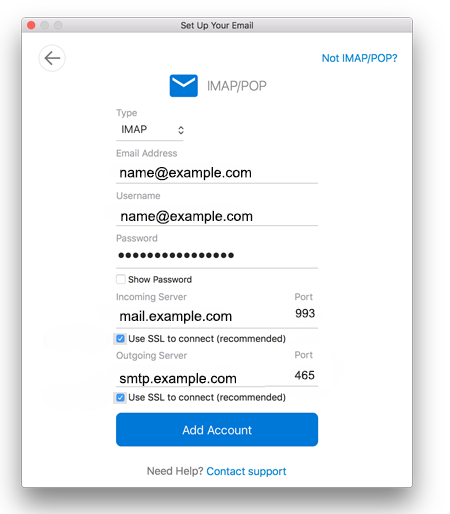
        • Choose IMAP or POP according to your preference.
        • Ensure that the User Name is the full email address in lower case.
        • If you don’t know your password, reset it in your control panel.
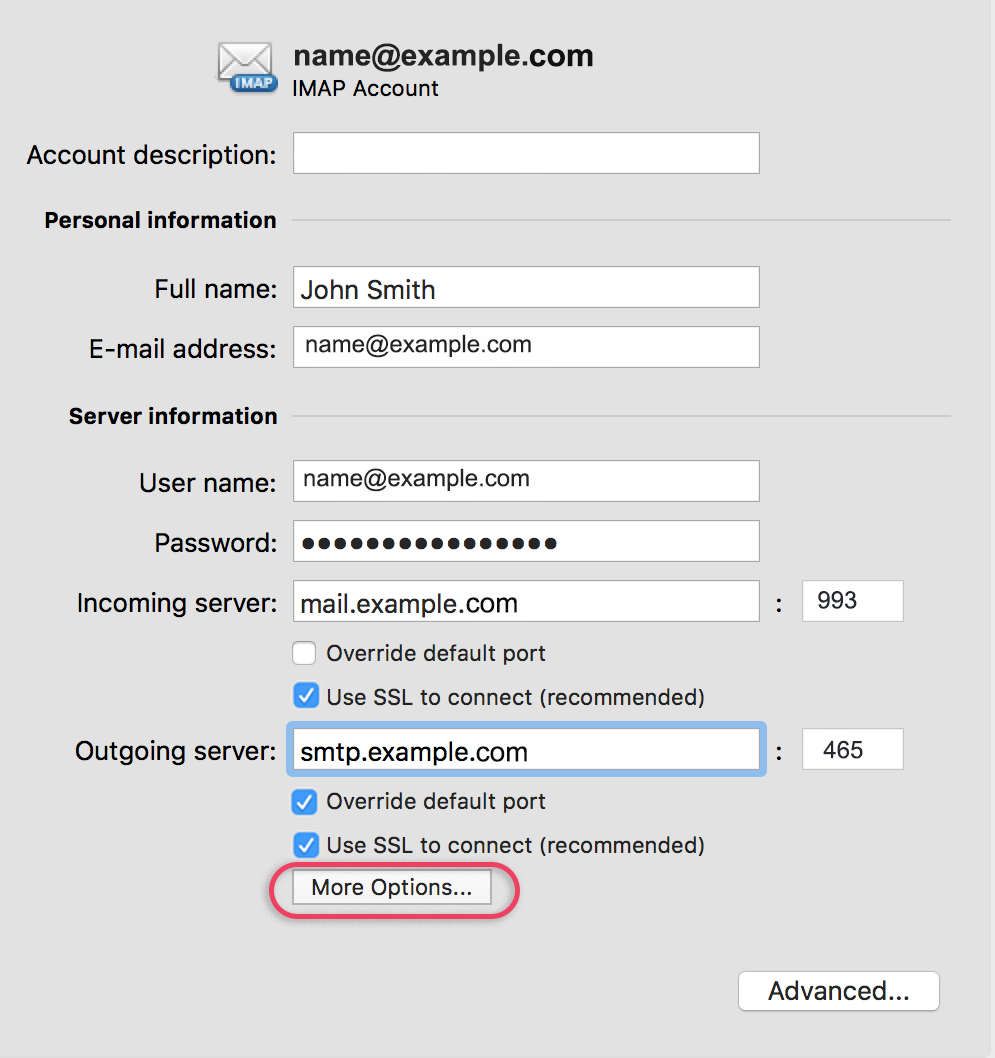
      7. Incoming server
        • add mail. before your domain name e.g. mail.example.co.za*
        • tick Use SSL to connect
        • Port  is 993 for IMAP or 995 for POP
      8. Outgoing server
        • add mail. before your domain name
        • Tick Use SSL to connect
        • Port is 465
      9.  Click Add Account

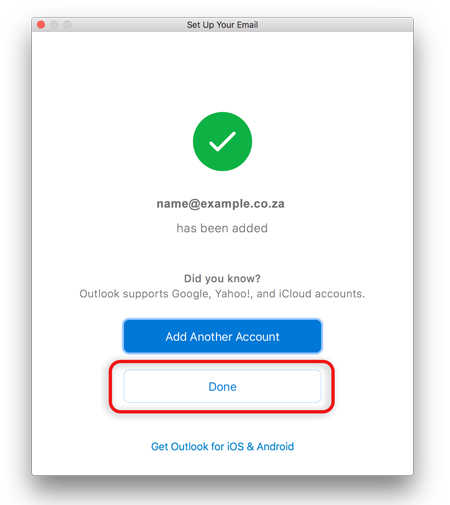
      10. Click Done
      11. You’re not quite done yet:
        • All settings should be correct on this screen – now choose More Options


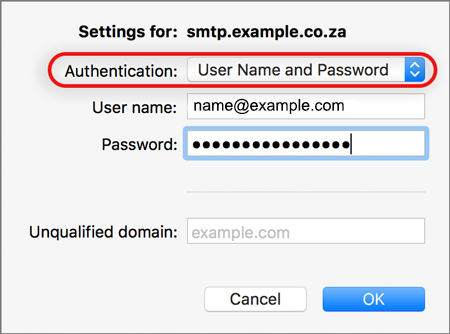
      Further Outgoing server settings 

      • Authentication: Use the dropdown arrow to select User Name and Password
      • Enter in your User name (full email address) and Password
      • Ignore Unqualified domain
      • Click OK

      * Note: In isolated cases mail.domain (e.g. mail.example.com) won’t work. In these cases you will need to use the server name instead

    1. You have completed your account setup.

  • How to set up email in Thunderbird for Mac

    This guide takes you step-by-step through the process of setting up a new email account in Thunderbird for Mac.

    Replace example.com with your domain name

    Automatic Account configuration

    A new email account set up with Thunderbird is quick and easy using Automatic Account configuration. 

    However, reasons to rather use Manual Configuration are:

    • if you prefer POP, as this automatic configuration defaults to IMAP 
    • if this is a new hosting account and domain propagation has not completed

    View account settings

    1. Launch Mozilla Thunderbird
    2. If this Accounts screen opens, choose to Create a new account > Email – proceed to step 4

      Thunderbird Mac email setup
      Or alternatively, on the toolbar at the top, select Tools and then Account Settings

      Add mail account

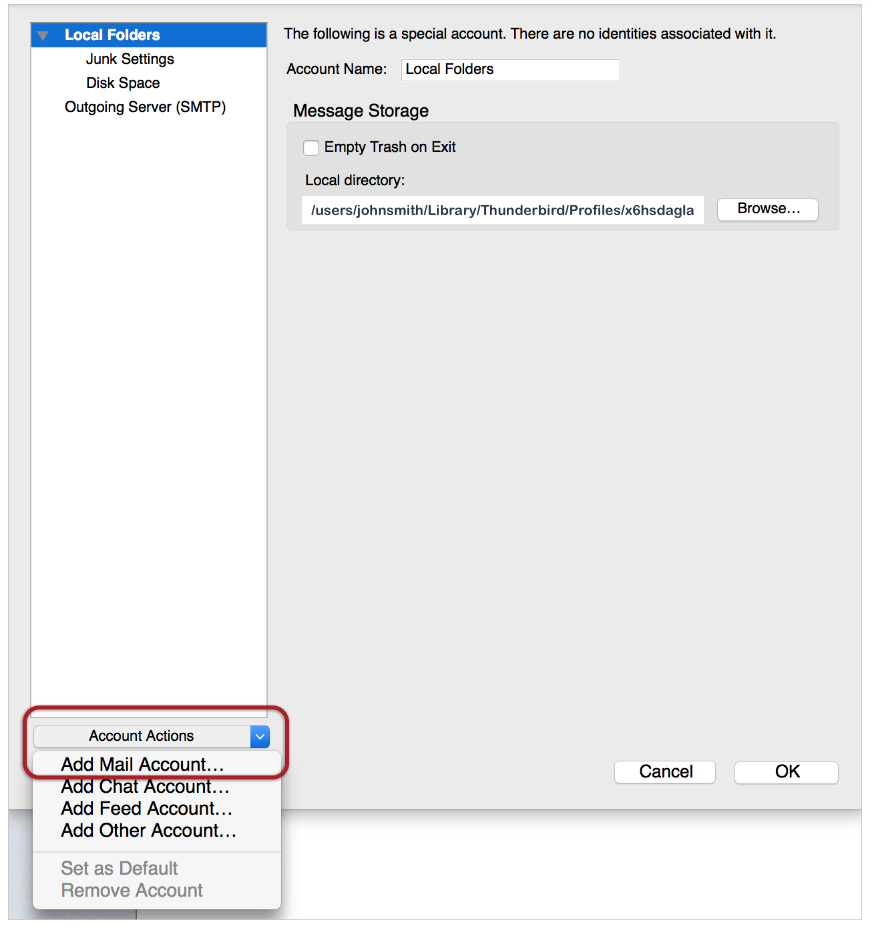
    3. Click the Account Actions drop-down and then select Add Mail Account from the list
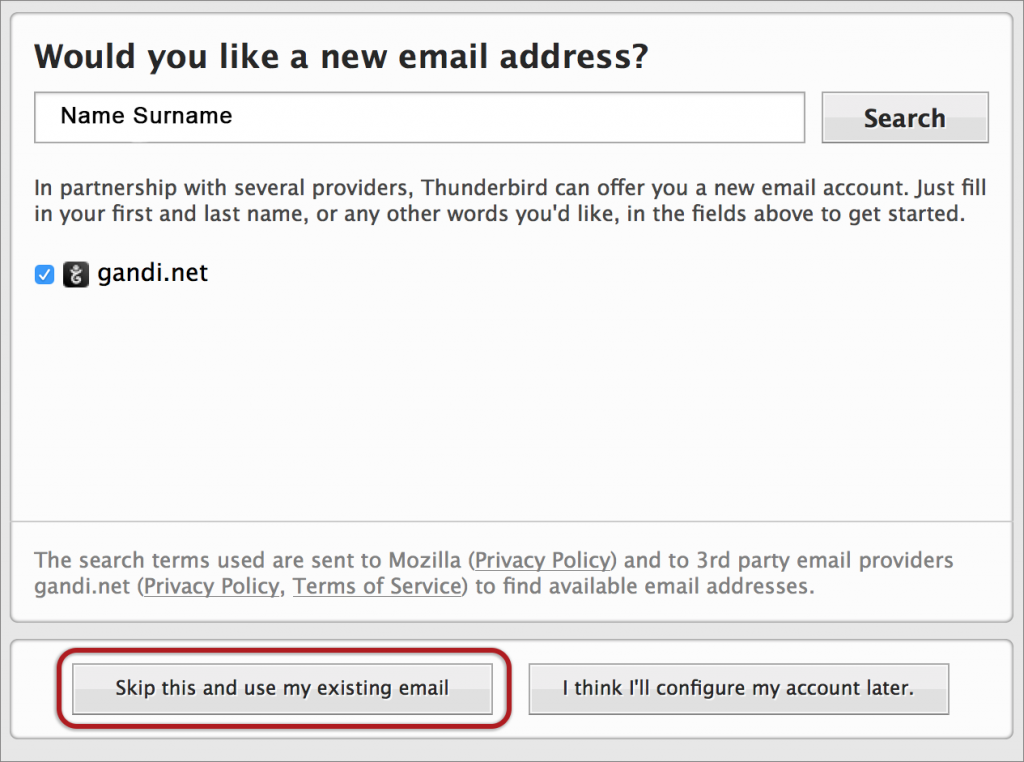
    4. Ignore this option and choose to Skip this and use my existing email?

      thnderbird mac skip

      Enter your details

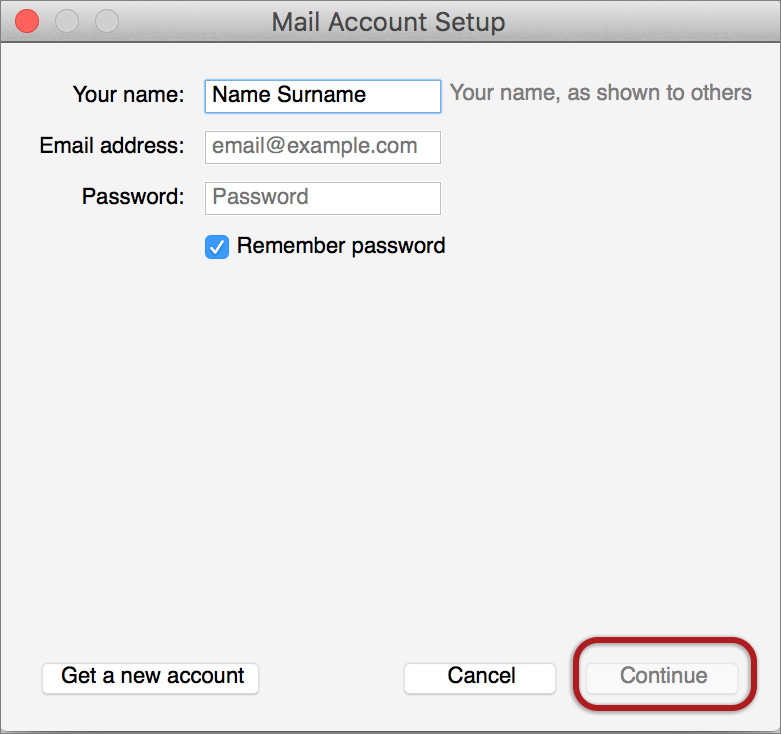
    5. Enter the following details:
      • Name (which will appear the “From” field in your emails)
      • Email address
      • Password (stipulated when you created your email account in your Control Panel – (forgotten passwords can be reset in your Control Panel)
    6. Then click Continue

      thunderbird mac account setup

      Edit settings

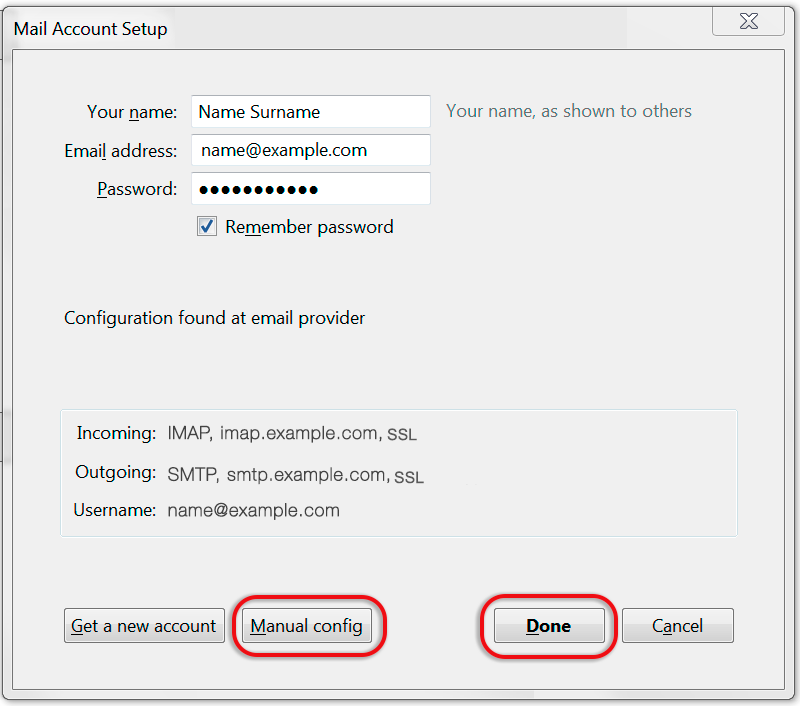
    7. Thunderbird will now automatically check your email settings.
    8. This screen confirms your chosen settings > Done

    If your settings are not found, click the Manual config button and continue:

    Manual configuration

    Follow the Automatic configuration above, and then choose Manual config.

    Ensure that your settings are correct as below (these are the default settings – replacing with your own name and domain).

    • If you don’t know your password, reset it in your Control Panel.
    • Server hostname:
      • Incoming can be POP or IMAP
      • is mail. followed by the domain name e.g. mail.example.com*
      • Port is 993 (or 995 for POP)
      • SSL is set to SSL/TLS
      • Authentication is Normal password
      • Outgoing SMTP is mail. followed by the domain name e.g. mail.example.com*
      • Port is 465
      • SSL is set to SSL/TLS
      • Authentication is Normal password
    • User Name is the full email address for both Incoming and Outgoing

    Choose Re-testDone.

  • How to set up email in Apple Mail

    How to set up email in Apple Mail

    User Name :
    Your user name is your full email address
    Incoming Server : mail.yourdomain.co.za
    Ports : IMAP 993 / POP 995
    Outgoing Server : mail.yourdomain.co.za
    Port : SMTP 465
    Encryption: SSL/TLS

    Replace example.com with your domain name.

    Add Account

    1. Launch Apple Mail.

    2. From the toolbar at the top, select File and then Add Account.

    Apple Mail Setup

    Apple Mail Setup

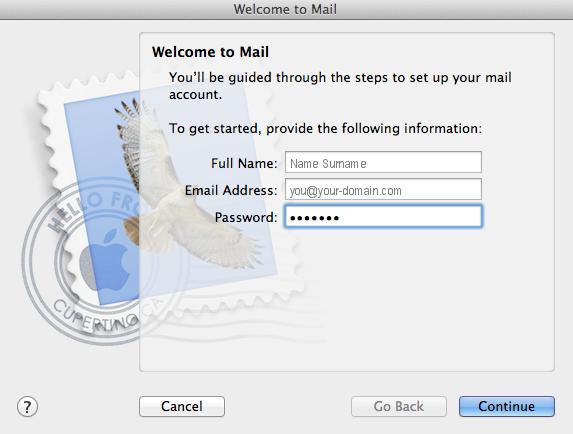
    3. Enter your name (which will appear the “From” field in your emails), email address and password, then select Continue (forgotten passwords can be reset in your control panel)

    Incoming Server Settings

    4. Complete the information:

    • Account Type can be IMAP or POP  (IMAP is default)
    • Description (optional) e.g. your company name
    • Incoming Mail Server – has mail. before the domain name e.g. mail.example.com*
    • User Name is your full email address
    • Password is your mailbox password (as in the previous screen)

    5. Apple Mail will now test the connection to the specified mail server. Once this is complete, select Continue.
    Incoming Mail Security

    6. When the Incoming Mail Security screen appears, ensure the Use Secure Socket Layer option is ticked. The authentication drop-down can remain on Password, select Continue.

    Outgoing Server Settings

    7. Complete the information:

    • Description (optional) e.g. your company name
    • Outgoing Mail Server –has mail. before the domain name e.g. mail.example.com*
    • Use only this server can remain ticked
    • Select Use Authentication
    • User Name is your full email address
    • Password is your mailbox password (as in the previous screen)

    8. Select Continue

    Account Summary

    9. View the account summary and select Create. Ticking the Take my account online checkbox will ensure that your account is activated immediately.

    * Note: In isolated cases mail.domain (e.g. mail.example.com) won’t work. In these cases you will need to use the server name instead

    You have completed your account setup