Author: admin

  • Outlook for Outlook 2016 or Microsoft 365

    This guide takes you step-by-step through the process of setting up a new email account in Outlook 2016 or Outlook for Microsoft 365

    Replace example.co.za with your domain name.

    1. Launch Outlook
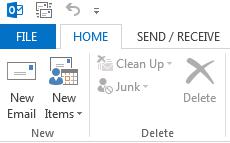
    2. Select File on the top left menu bar

    3. Select the Add Account button in the middle of the screen, then Account Settings

      outlook2013-add-account1

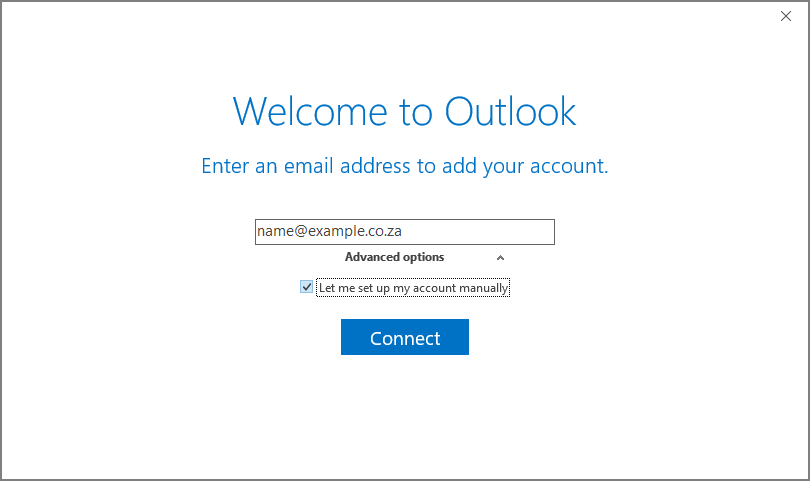
    4. Insert your email address

    5. Select Advanced options, then select Let me set up my account manually  > Connect

    6. This temporary screen will display

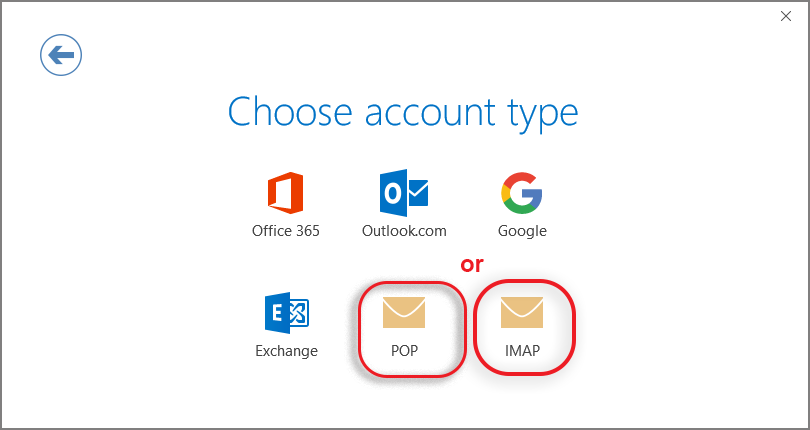
    7. This screen will display the various account options – select POP or IMAP

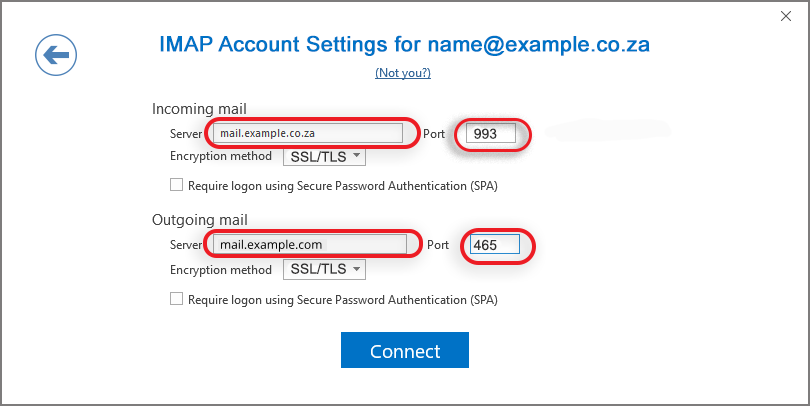
    8. Server Settings: (Note that some versions of Outlook don’t allow you to adjust server settings at this stage. In these cases, complete the account setup and then check your server settings by going to File > Info > Account Settings dropdown > Server Settings).
      • Incoming mail: add mail. before your domain name e.g. mail.example.co.za*
        • Port 993 (or 995 for POP)
        • Encryption method: SSL/TLS
        • Require logon using Secure Password Authentication (SPA) is unticked
      • Outgoing mail: add mail. before your domain name e.g.mail.example.co.za*
        • Change Port to 465 (not 25)
        • Encryption method: SSL/TLS
        • Require logon using Secure Password Authentication (SPA) is unticked
    9. Click Connect
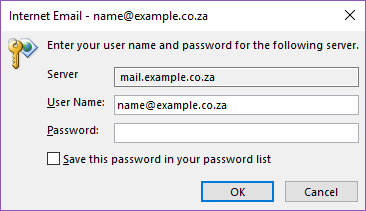
    10. You will now be prompted for the password

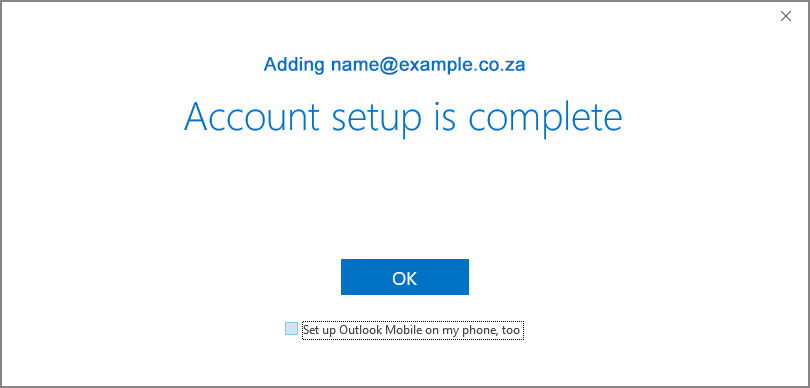
    11. Your setup is complete!

    12. Send a test mail and if there are any errors, refer to our Troubleshooting guides
  • Add your Texo-hosted email account to Gmail

    Your domain email address can be accessed using any mail program, including Gmail.

    The advantages of using Gmail are:

    • the interface may be more familiar to you if you are already using it
    • your mail can be accessed from any online computer or device
    • 15GB of storage is provided per mailbox, which is useful if you want to store a large amount of mail without incurring diskspace charges at Texo.

    Set up your Texo-hosted email

    If you are setting up your email on a cell phone or tablet, refer to: How to set up your email for Gmail on mobile.

    1. Browse to Gmail and log in
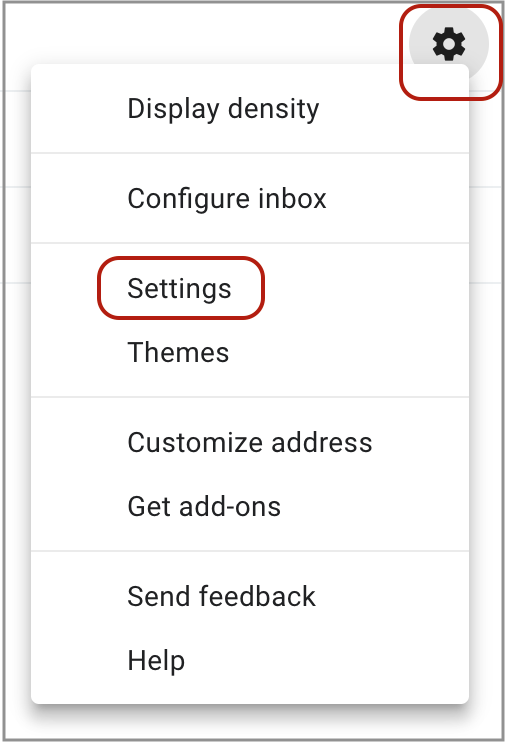
    2. Select the Settings icon from the top-right menu, then choose Settings from the drop-down list:
    3.  Select Accounts and Import
    4. Select Add a mail account
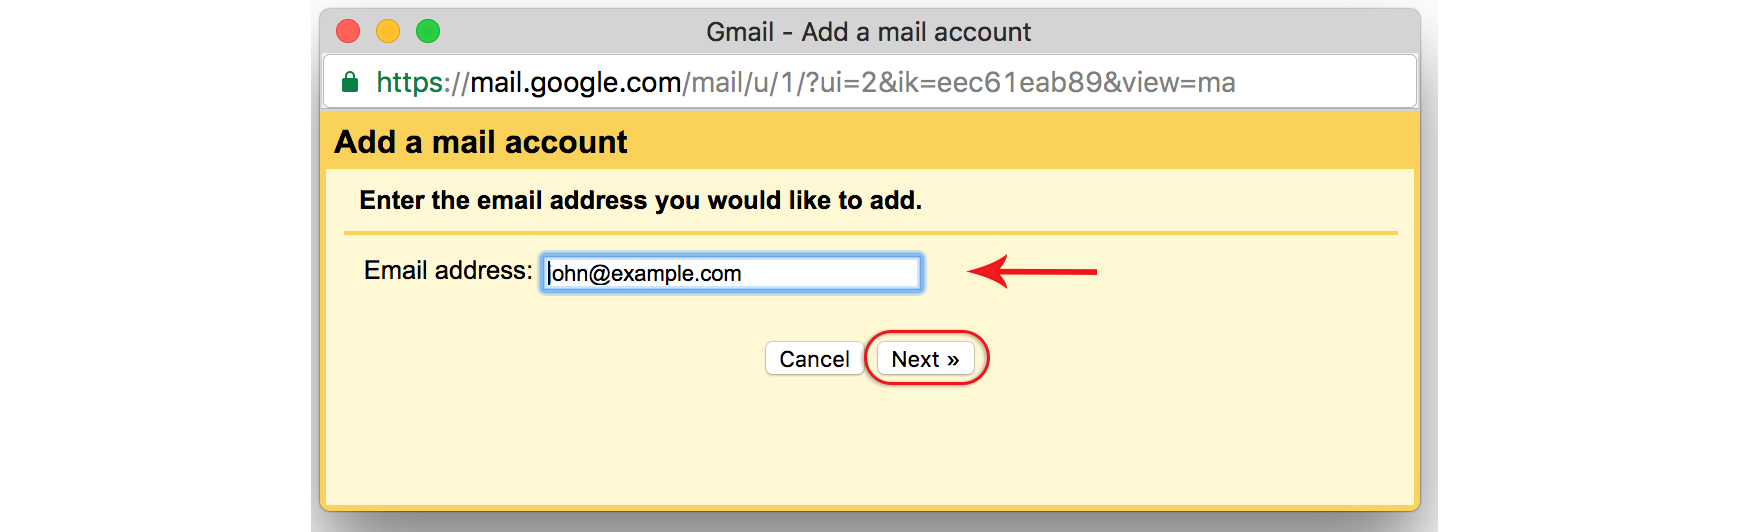
    5. Enter your Email address, select Next
    6. Select the second option and select Next
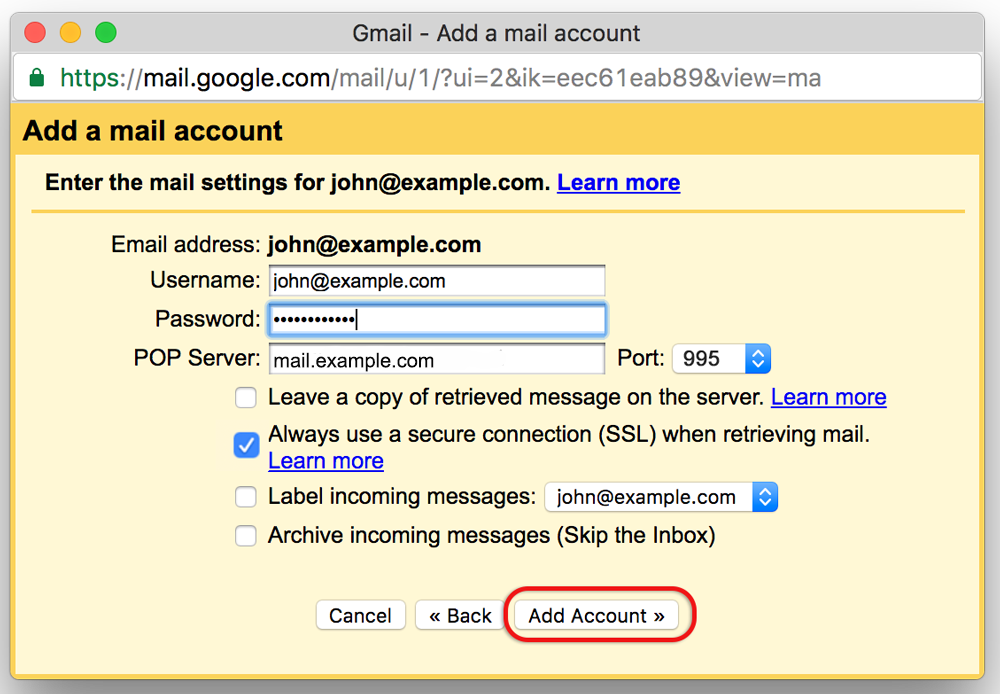
    7. Gmail will automatically add certain settings, but check that:
      • The Username is the full email address
      • The Password is included
      • The POP Server has mail. in front of the domain name e.g. mail.example.com*
      • Port is 995
      • Always use a secure connection (SSL) is checked
    8. Select Add Account
    9. Your account has now been set up to receive your domain email, but you can now continue to set up the account to send mail from your domain. Select Yes and Next
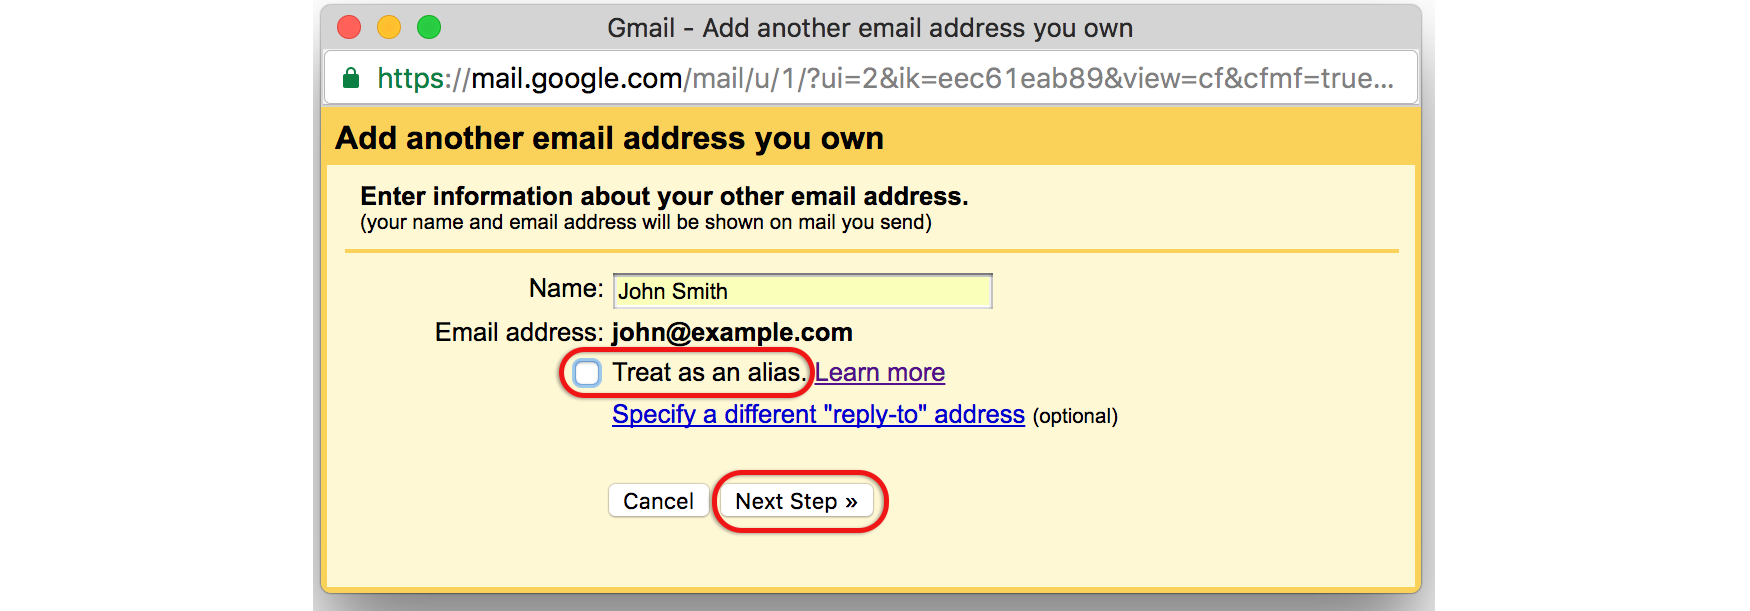
    10. Untick Treat as an alias
    11. Select Next Step
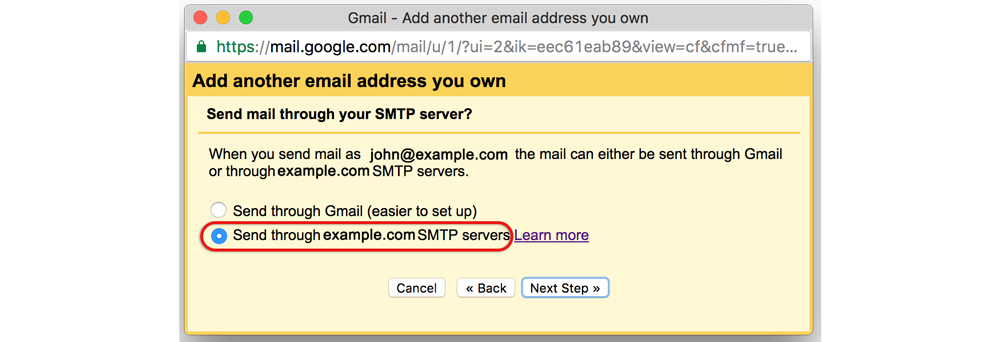
    12. Send mail through your SMTP server? Select the second option. The default setting is to send mail using Gmail SMTP servers, and while this will work, it is not recommended. The reasons are that Gmail servers are more likely to be blacklisted for spam abuse, and certain mail servers will not receive mail from domains that are not associated with that particular server.
    13. The current dialogue box opens up to add the SMTP details. Ensure that:
      1. The SMTP Server has mail. in front of the domain name e.g. mail.example.com*
      2. The Username is the full email address
      3. The Password is included
      4. You select SSL with port 465
        OR
        TLS
        with port 587 (as shown below)
    14. Select Add Account
    15. Gmail will check credentials, and then provide the following dialogue box:
    16. Open your mail and click the link on the confirmation email
    17. Confirmation success! Your domain mail is now set up to be accessed via Gmail.

  • How to create a full backup

    This first section is for All-in-One and WordPress MAX hosting. For Starter Hosting (on DirectAdmin) please scroll down to the Starter Hosting section.

    All-in-One and WordPress MAX Full Backups

    If you would like to make a FULL backup of your entire hosting account (website files, databases, email accounts, emails, email forwarders and so on) then please follow these steps:

    1. Log into your cPanel
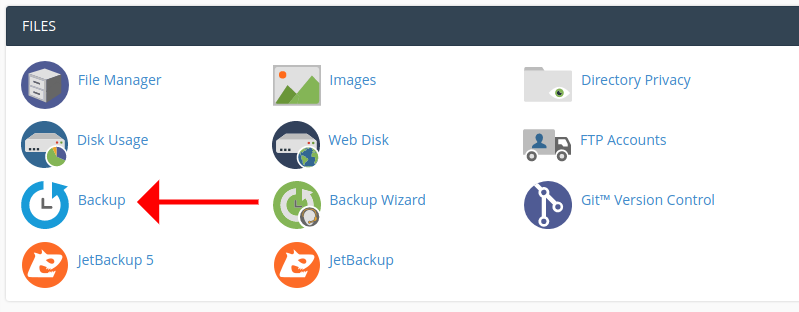
    2. Find the Files section, and click on the Backup tool icon:
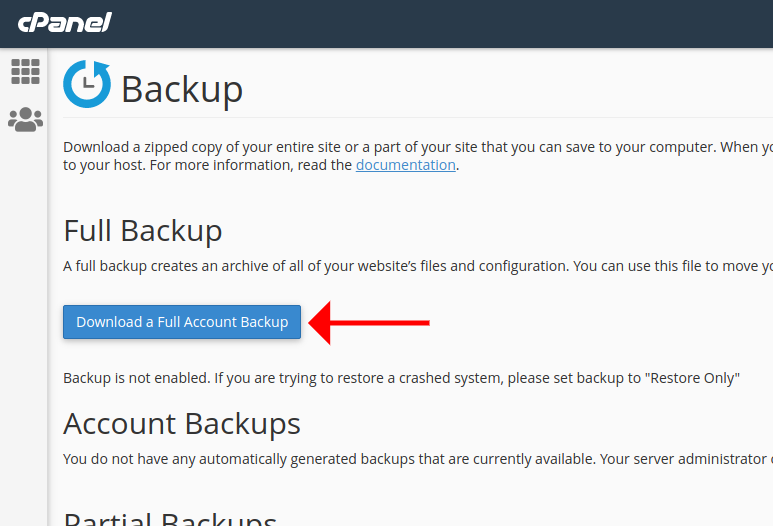
    3. In the Full Backup section, click on the Download a Full Account Backup button:
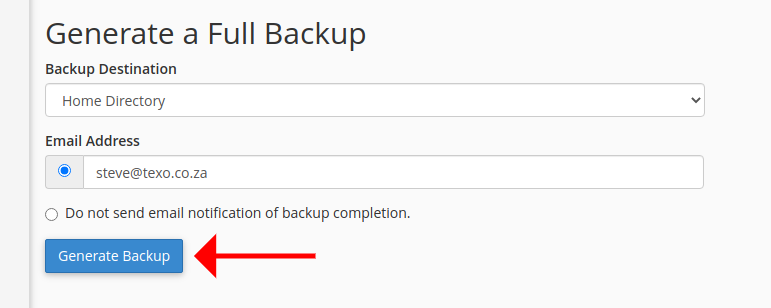
    4. If you would like to receive an email when the backup is ready, then enter an email address, or select the “Do not send email notification of backup completion” option
    5. Click on the Generate Backup button:
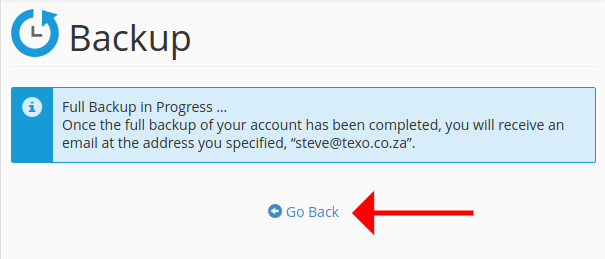
    6. You will see a notice that the backup is being generated. Click on the “Go Back” link:
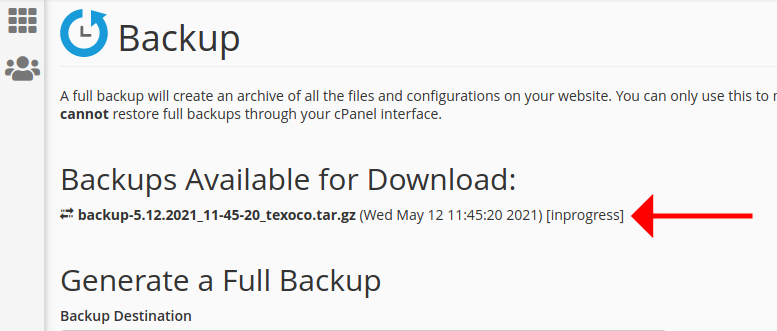
    7. cPanel will now display the name of the backup file it is creating, and that it is “in progress”:
    8. You can either wait for the email notification that the backup has completed, and then return to this page, or refresh it every few minutes to see if the backup is ready. If you have a large site which is using a lot of diskspace, then it can take a long time to create the backup.
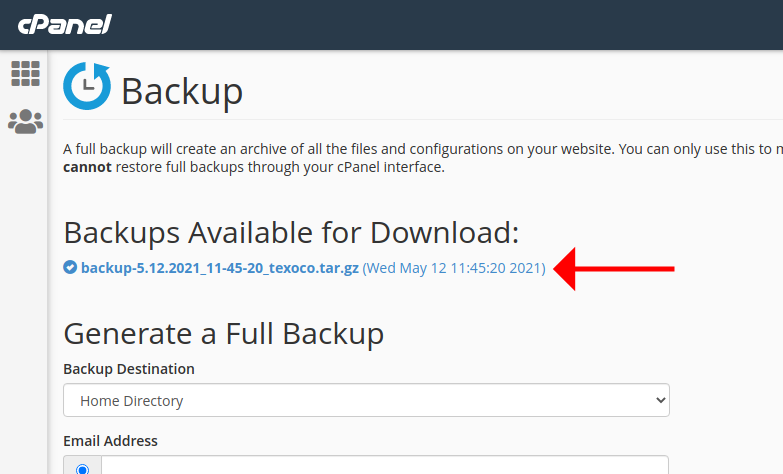
    9. When the backup is ready, the backup filename will change to a blue link, which you can click on to download the backup for safekeeping:
    Important: you must download the backup for safekeeping! Our servers regularly perform maintenance during which backup files are deleted from the server.

    Starter Hosting Backups

    Starter Hosting packages are hosted on DirectAdmin servers, which have a completely different interface in the Control Panel.

    1. Log into your Control Panel
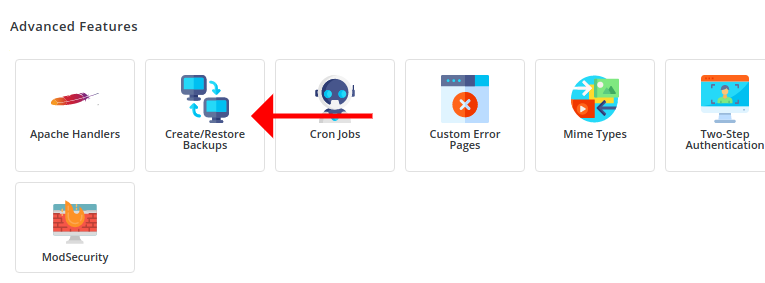
    2. In the Advanced Features section, click on the Create/Restore Backups icon:
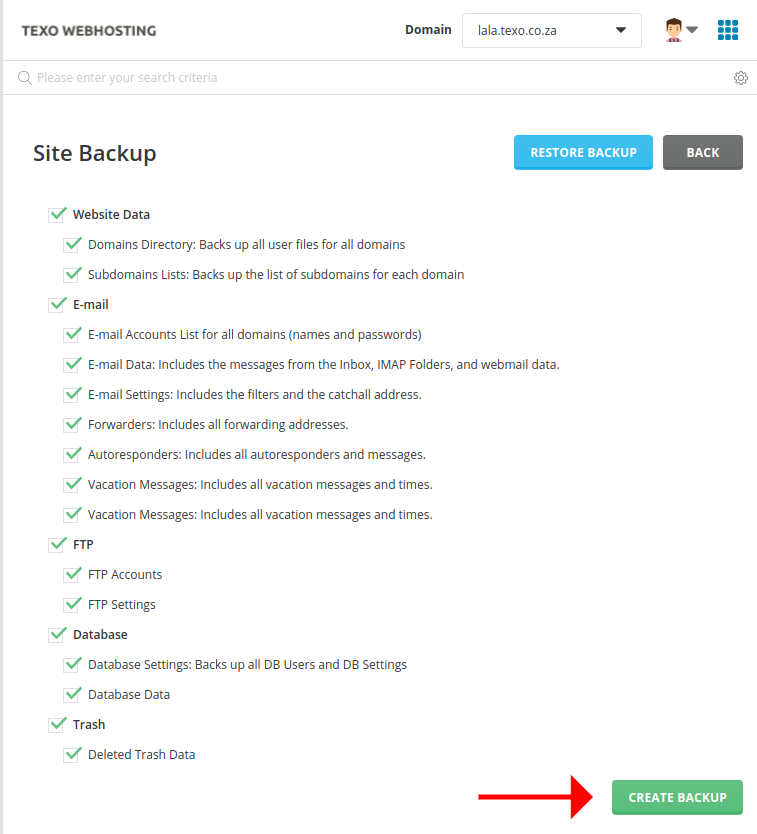
    3. You will see that everything has been selected, which is correct for a full backup. Click on the green Create Backup button to start the backup creation process:
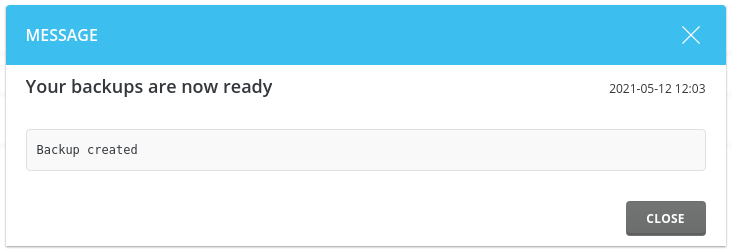
    4. When your backup is ready, the server will send you an email with a link. Click on the link, and you will see the following message:
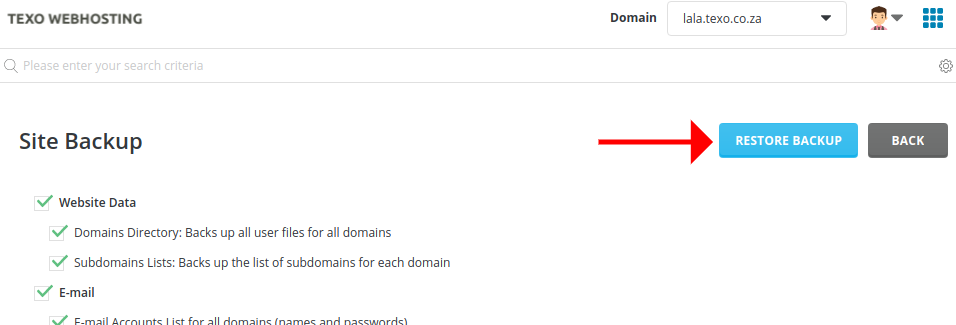
    5. If you click on the Create/Restore Backups icon, then you will be able to click on the blue Restore Backup button to restore any backups you have made:
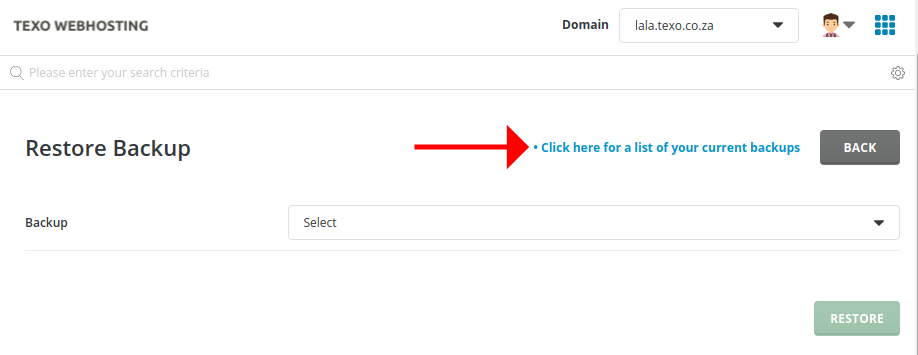
    6. After clicking on the Restore Backup button, you will also see a link to view all the backup you have made:
    7. If you click on that link, you will be taken to your File Manager, where you can download the backup file for safekeeping:
    Important: you must download the backup for safekeeping! Our servers regularly perform maintenance during which backup files are deleted from the server.
  • MailScanner and MailControl

    MailScanner

    We use the anti-spam tool MailScanner on all our servers at Texo. MailScanner scans every email that is sent to you for spam and viruses, and does not deliver those emails which score highly as spam and which contain malware.

    It also uses RBLs (Reputation/Realtime Block Lists) such as SpamCop and SpamHaus to identify spam emails.

    By default, our MailScanner considers spam that scores between 7 and 14 as Low-Scoring Spam, and emails which score 15 or higher as High-Scoring Spam. Neither Low-Scoring nor High-Scoring Spam is delivered to you by default.

    The MailScanner settings for your account, though, are entirely under your control. You can either set MailScanner to deliver spam, to stop scanning for spam, or to deliver spam to a mailbox you designate for this purpose, perhaps so that you can check it periodically (via Webmail) for any false-positives.

    How to whitelist and blacklist with MailScanner 

    If you find that emails from a genuine sender are often being blocked as spam, either because they are sending from an ISP or IP address which is blocked by an RBL, or because our MailScanner is just getting it wrong and classifying their emails as spam when they are not, then you an add then to your personal email whitelist.

    Alternatively, if you find that  emails from a particular sender are not being blocked by MailScanner ebven though they are spam, you can add the sender or sender’s domain to your personal Blacklist.

    1. Log into your Control Panel
    2. Click on the MailScanner icon in cPanel (All-in-One  and WordPress MAX hosting):
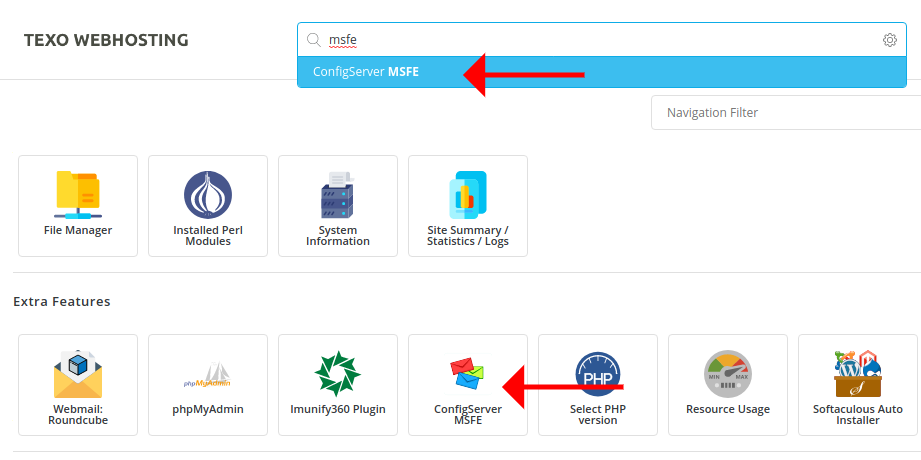
    3. or Configserver MSFE icon in DirectAdmin (Starter Hosting):
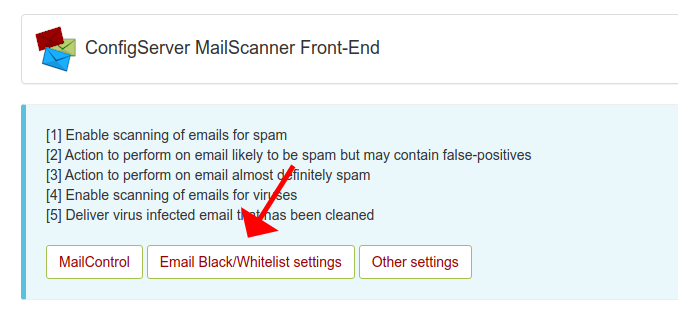
    4. In the MailScanner tool, click on the Email Black/Whitelist Settings button:
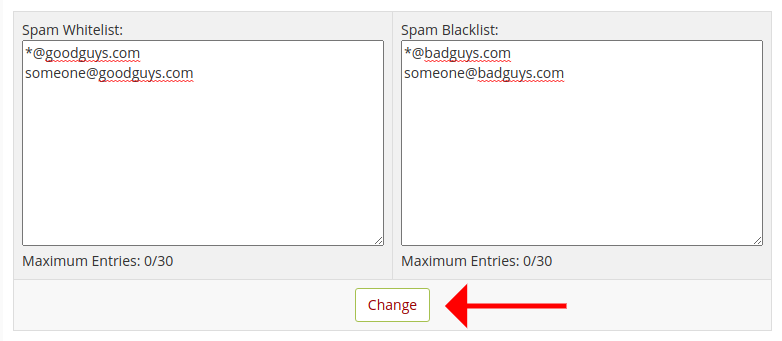
    5. Enter the email addresses or domains you want to whitelist in the Spam Whitelist section, and emails you would like to blacklist in the Spam Blacklist section.
      To block a single email address, enter the email address.
      To block an entire domain, enter *@ followed by the domain you would like to block, for example *@badguys.com
    6. when you are done, click on the Change button:
    Personal whitelist/blacklist settings can take up to 15 minutes to be added to MailScanner.

    How to change MailScanner spam scoring

    You might want to change the score that an email requires before MailScanner considers it to be spam, if you find that many non-spam emails are being blocked as spam.
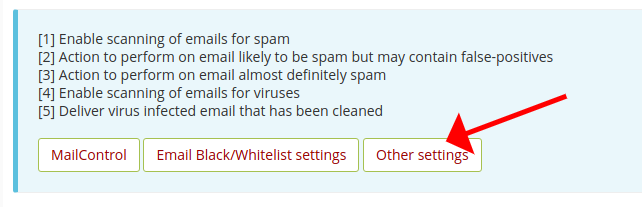
    1. In the MailScanner tool, click on the Other Settings button:
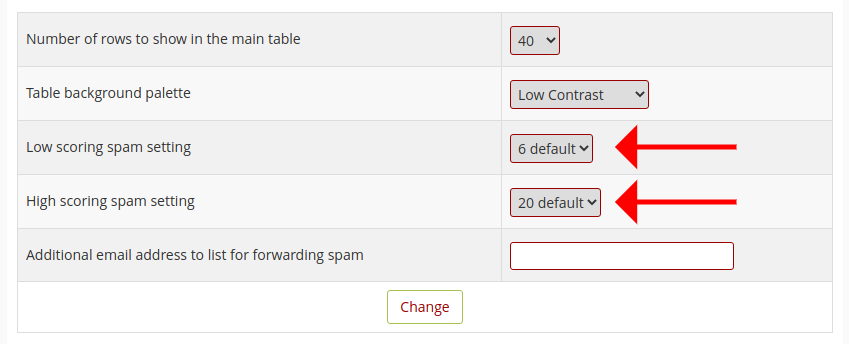
    2. You will now see the server’s Low scoring spam setting and High scoring spam setting values, which you can change to whatever you like:
    The higher the value, the more spam will get through. The lower the value, the more non-spam emails will be blocked as spam,  so please use caution.

    How to control what MailScanner does with spam

    In the MailScanner tool, scroll down to the Change Individual Domain Settings section:

    Here you can do the following:

    1. Disable Spam Scanning entirely (not advisable!) by changing the drop-down selector to “no”
    2. Disable Virus Scanning entirely (don’t do this!) by changing the drop-down selector to “no”
    3. Tell MailScanner to deliver infected emails after it has cleaned them of malware/viruses (also not a good idea)

    you can also set MailScanner to deliver or forward emails that score as Low or High spam to spam@yourdomain.co.za

    If you set MailScanner to forward emails, please ensure that the email address spam@yourdomain.co.za is created, and clean it out regularly so that spam emails don’t use up too much diskspace

    MailControl User Guide

    The MailControl tool forms part of MailScanner, and allows you to view the emails which were blocked as spam, and not delivered to your email accounts.

    1. Log into your Control Panel
    2. For All-in-One and WordPress MAX accounts, click on the MailScanner icon (or search for “MailScanner” in the search bar at the top of the page):

      or, for Starter Hosting accounts, search for MSFE (MailScanner Front-End):
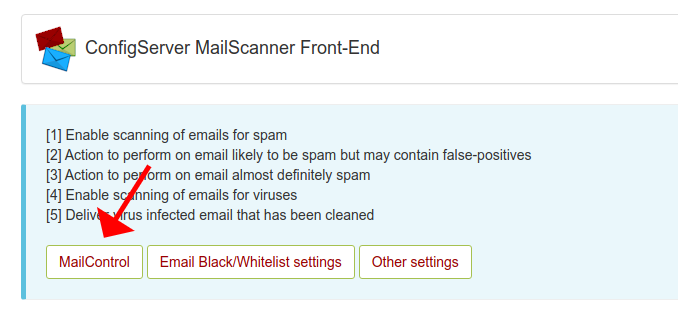
    3. Click on the MailControl button:
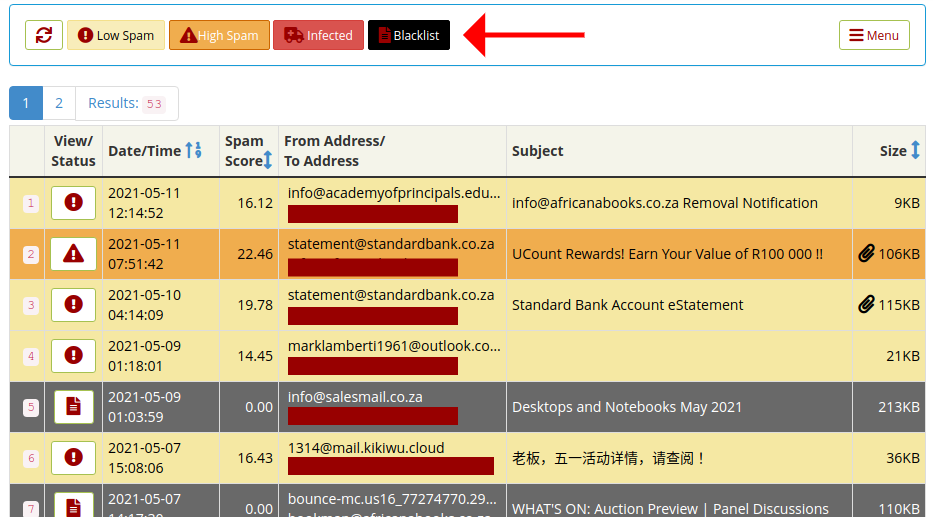
    4. All emails sent to any of the email addresses in your hosting account, which were blocked and not delivered will now be displayed. You can click on the Low Spam, High Spam, Infected and Blacklist buttons to sort by those categories:
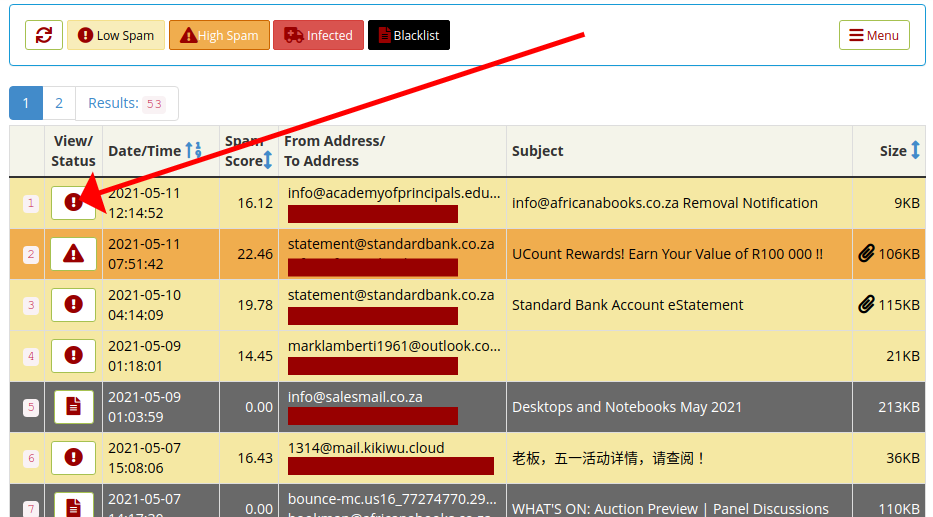
    5. If you would like to see more information about a blocked email, click on the icon in the View/Status column next to the email:
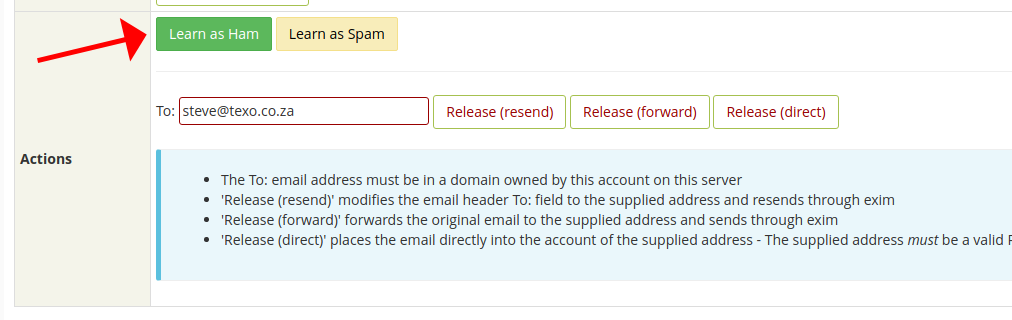
    6. If the email you are viewing is not spam, you can click on the Learn as Ham button at the bottom of the page, in the Actions block to “teach” MailScanner that it is not spam:
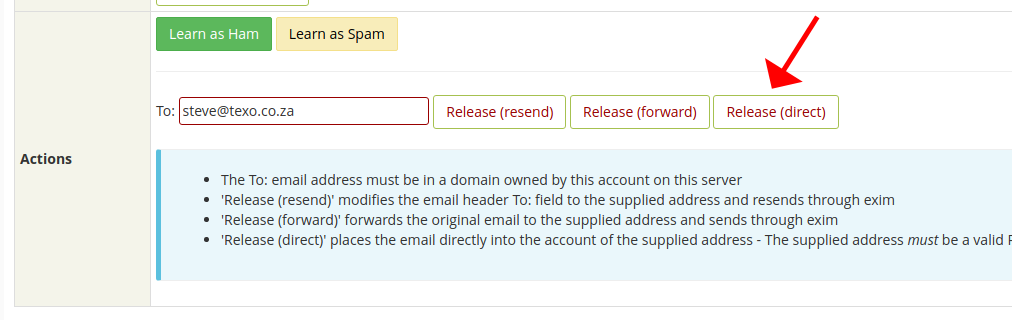
    7. If you would like to have the email delivered to the original recipient, click on the Release(direct) button:
  • Imunify360

    Imunify360 is security software installed on all of the servers at Texo.  It’s designed and developed by the amazing team at Cloudlinux.  Imunify360 uses herd immunity and a six-layer approach to provide our hosting customers with the highest level of security from all sorts of malicious attacks.  This includes DDOS attacks, Mod Security protection, malware scanning, website reputation management and a sophisticated firewall.  Imunify360 is designed to detect abnormal user behaviour including brute-force attacks which are becoming increasingly common, especially with WordPress sites.

    WordPress is a big target for hackers and the number of attacks on WordPress websites on our network is in the thousands every day.  Most users are unaware and that’s because Imunify360 is in place to help protect their websites.  The six-layer approach includes:

    • Real-time malware scanning
    • Advanced firewall with greylisting
    • Intrusion detection
    • Server Kernel Patching
    • Website Reputation Management
    • Web Applications Sandboxing

    How do I scan my website for malware?

    Imunify360 scans your files automatically as they get created or modified. There is no need to manually scan any files.

    How do I see what files have been detected as malware?

    To view a list of files that have been detected as malware, follow these steps:

    1. Log into your Control Panel.
    2. In the SECURITY section, click on Imunify360
    3. The Files page appears, and lists any malicious files that have been found:
      For more information on what a file’s status means, actions, what the reason means, etc. please visit https://docs.imunify360.com/user_interface/#files.

    How do I tell Imunify360 to ignore certain files?

    To tell Imunify360 to ignore certain files, follow these steps:

    1. Log into your Control Panel.
    2. In the SECURITY section of the cPanel home screen, click Imunify360
    3. On the top toolbar, click Ignore list
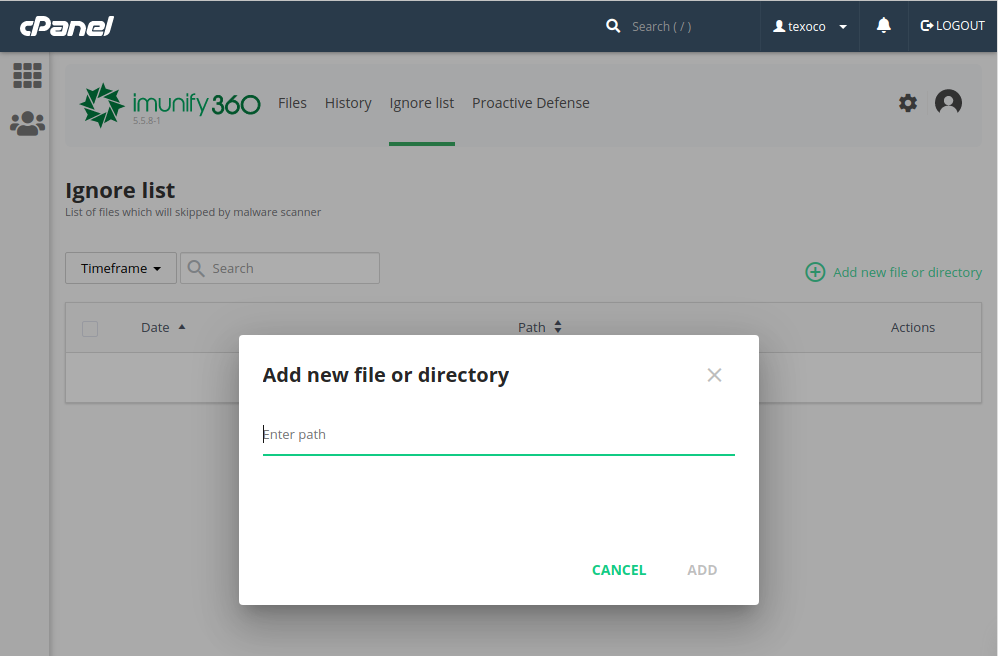
    4. To add a file to the ignore list, click +Add new file or directory on the right-hand side. Add the path to the file or directory, and it will be added to the ignore list

    Proactive Defense

    Proactive Defense protects websites running PHP against zero-day attacks by blocking potentially malicious executions automatically and with zero latency. Proactive Defense is enabled by default. It adds an additional layer of security to your website by blocking PHP scripts that contain code that could hurt your website or visitors. Proactive Defence has three modes:

    • Disabled: This means that the Proactive Defense feature is not working and a system is unprotected.
      Data is logged in all modes except Disabled.
    • Log Only: This means that possible malicious activity is only logged, and no actions are performed (default mode).
    • Kill Mode: This is the highest level of protection. Scripts are terminated as soon as malicious activity is detected.
    For security reasons, we highly recommend that Proactive Defense is left in Kill Mode. Please exercise extreme caution when disabling Proactive Defense.

    To disable or enable Proactive Defense, follow these steps:

    1. Log into your Control Panel.
    2. In the SECURITY section of the cPanel home screen, click Imunify360
    3. On the top toolbar, click Proactive Defence
    4. To disable Proactive Defence, click Disabled in the Mode Settings toolbar. This disables Proactive Defence on your site.
    5. To enable Proactive Defence, click Kill Mode in the Mode settings toolbar. This enables Proactive Defence on your site.

    More Information

    For more information, please visit:
    https://www.imunify360.com/

  • CloudLinux and Resource Levels

    Ever wonder what keeps our servers running smoothly and how we ensure that server resources are fairly used and distributed between clients?

    What is CloudLinux?
    CloudLinux is a special kernel distribution (or Operating System) we run on our servers which is designed to allow us to allocate certain amounts of resources to accounts. Like disk space and bandwidth, we can also restrict the amount of CPU power and RAM each account can use, as well as other resources. It is the ability to set limits on these resources that allow us to ensure that no one account can consume more than their fair share and cause problems for other users on our servers.

    Before CloudLinux, it was possible that one or two very busy websites could bring down an entire server – causing problems for potentially hundreds of people or more! In these situations it was not uncommon for hosting companies to simply suspend the problem accounts until the situation was resolved and traffic decreased. Fortunately this is no longer something we have to be concerned about.

    You may have noticed that when you login to cPanel there is a bar on the right-hand side that contains lots of information about your hosting account..

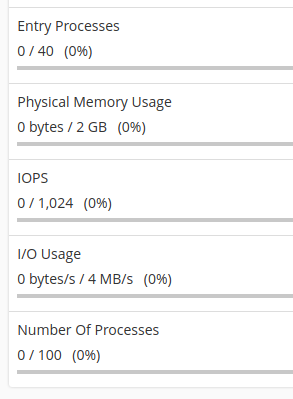
    Typically this shows you the amount of disk space you are using, as well as how much bandwidth you have used for that month so far and more. Some of these values belong specifically to CloudLinux and it’s these values we will look at in further detail:
    CPU Usage
    This value represents how much of your allocated CPU resources you are currently using. The amount of CPU resources we provide to each account is a percentage of the servers resources. For example, we may provide up to 10% of the entire servers CPU resources to each account, depending on which type of package you have with us.

    If this value reaches 100% then it means you are using all of the available CPU resources we have allocated to your account. It does not mean that the server is using 100% of its CPU usage. Once this value hits 100%, any additional processes that try to use the CPU are put to sleep and will have to wait until any previous processes have completed. This can cause your website to appear to slow down dramatically and may even time out in extreme cases.

    Physical Memory Usage
    This value represents how much memory (or RAM) your account is currently using. Every process created by your account will consume memory; so every PHP page that a user accesses, every mail connection you make and so on. Unlike CPU usage where we provide a percentage of the servers resources, we implement a fixed amount here.

    If this value reaches 100%, or the advertised limit, you may begin to experience PHP errors (if applicable) on your website, or in very extreme cases may see a CloudLinux error page. These errors are typically only brief and once the usage has reduced to below the limit, will automatically clear.

    Entry Processes
    Entry processes are the number of processes that enter your account. For example, every PHP page that is accessed by a user will usually generate a single entry process. Many people misinterpret this value as “number of visitors you can have on your website at once”. Whilst it is true that each visitor accessing a PHP page will spawn an entry process, these processes usually end so quickly that it is extremely unlikely that 10 will be spawned  concurrently and at a single moment unless you had a significantly large number of simultaneous visitors on your website at once. SSH sessions and cron jobs also count towards entry processes.

    If the limit for entry processes is met then further processes will be denied. If you are trying to access a PHP page you may receive a 508 (Resource Limit Reached) page.

    Number Of Processes
    This is very similar to the above but includes all processes generated by the account rather than the specific PHP, SSH or cron jobs. This number is typically very low, even under high activity, as non-PHP tasks execute and complete even more quickly.

    I/O Usage
    This value represents how much I/O (or disk activity) your account is using. Any task which makes use of the servers disk drive (such as reading or writing to the server) will consume I/O. We limit the maximum disk speed of each account to ensure that no single account can saturate the disk drives which will reduce performance for everyone.

    Reaching this limit will cause all processes to slow down (to within this limit) and take much longer to complete. Typically you won’t notice this setting ever increase unless you perform something disk intensive like generating a large backup on your account.

    Inodes
    While we don’t at present have an inode limit, if we do introduce inode limits, the following information will apply: Every file and folder inside your account will count as 1 inode. We limit the maximum number of inodes to ensure that users try to use the best methods available for structuring their website content. The more files an account has, the longer it subsequently takes for our backups to run and this overall can impact performance of these tasks significantly.

    If the inode limit is met, no further files or folders could be created on the account. This can actually be very serious and will result in the inability to receive e-mail and may even prevent your website from working if it needs to generate a cache or temporary files.

  • How to login to your WHM

    There are two ways to login to your WHM:

    Through your Texo Client Area:

    1. Login to the Texo Client Area
    2. Click on Services > My Services
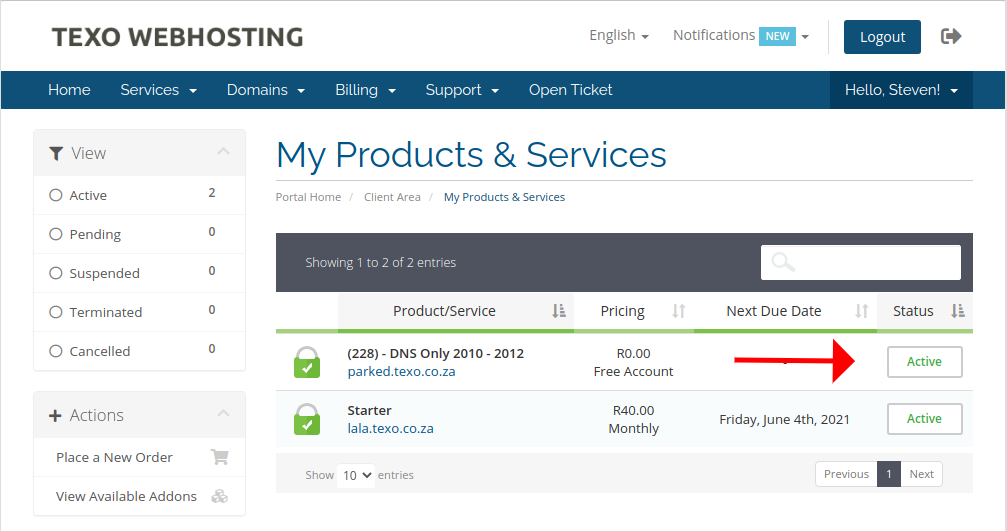
    3. Click on the green ACTIVE button next to the correct hosting account
    4. Click on the Login to WHM link in the left menu

    Directly:
    your WHM is always located at yourdomain.co.za/whm

    (replace yourdomain.co.za with the correct domain)

    You can find the username and password in the New Account Email that was sent to you when you signed up, and also in your Texo Client Area:

    1. Login to the Texo Client Area
    2. Click on Services > My Services
    3. Click on the green ACTIVE button next to the correct hosting account
    4. Your cPanel/WHM username and password are displayed at the top of the page

  • How to login to your Control Panel

    There are two ways to login to your cPanel:

    Through your Texo Client Area:

    1. Login to the Texo Client Area
    2. Click on Services > My Services
    3. Click on the green ACTIVE button next to the correct hosting account
    4. Click on the Login to cPanel link in the left menu

    Directly:
    your cPanel is always located at yourdomain.co.za/cpanel

    (replace yourdomain.co.za with the correct domain)

    You can find the username and password in the New Account Email that was sent to you when you signed up, and also in your Texo Client Area:

    1. Login to the Texo Client Area
    2. Click on Services > My Services
    3. Click on the green ACTIVE button next to the correct hosting account
    4. Your cPanel username and password are displayed at the top of the page