Author: admin

  • Set up email in OS X Yosemite Mail

    Set up email in OS X Yosemite Mail

    User Name :
    Your user name is your full email address
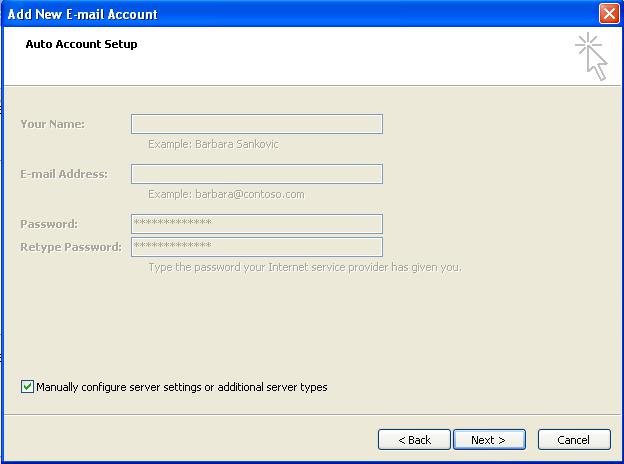
    Incoming Server : mail.yourdomain.co.za
    Ports : IMAP 993 / POP 995
    Outgoing Server : mail.yourdomain.co.za
    Port : SMTP 465
    Encryption: SSL/TLS

    Replace example.com with your domain name.


    Add a new email account

    1. Launch Mail.
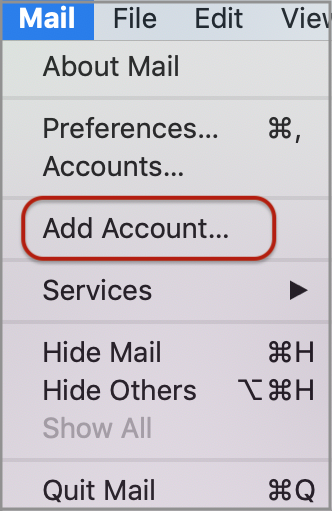
    2. From the toolbar at the top, select Mail and then Add Account…
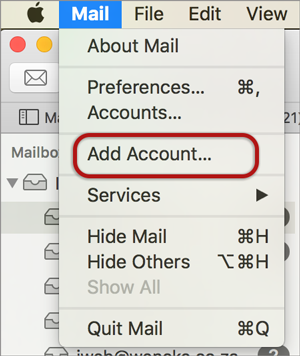
      mac-add-acount
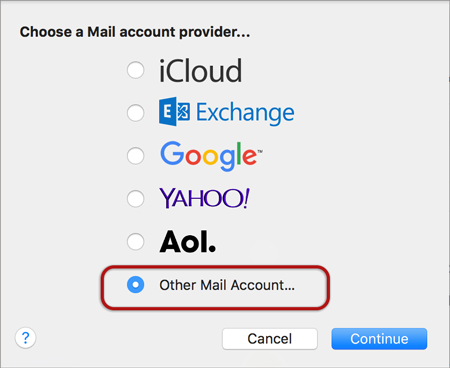
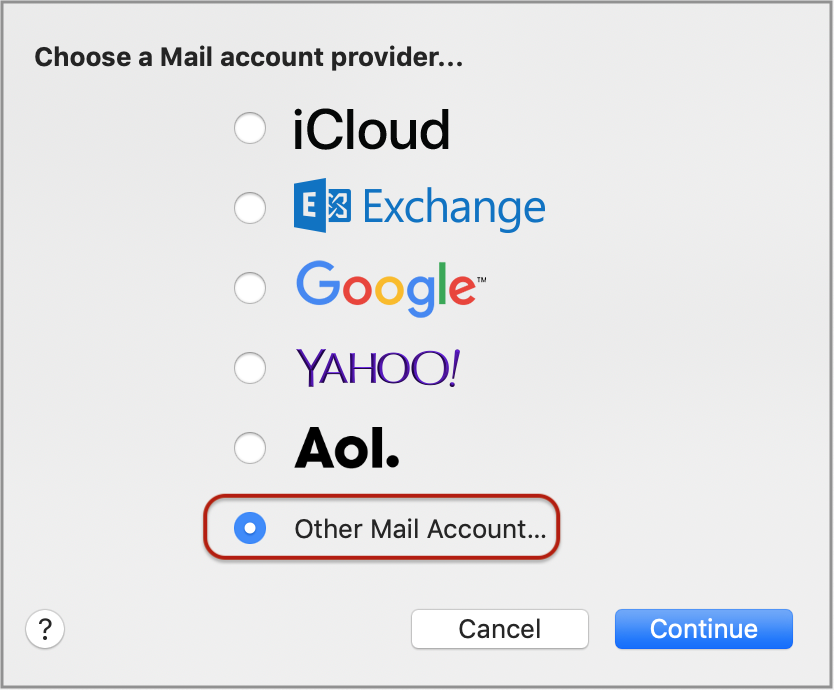
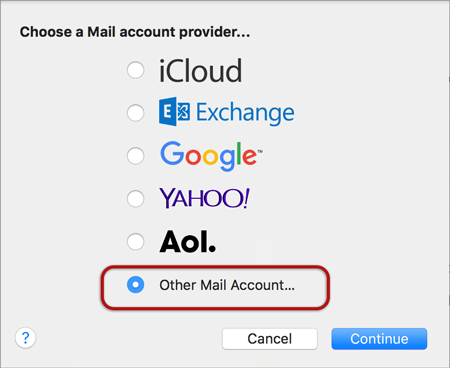
    3. Select Other Mail Account…
      mac-othe-mail
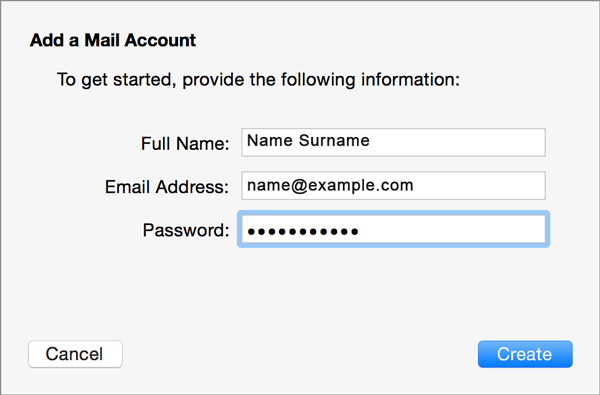
    4. Enter your details
      • Full Name – the name that will appear in the ‘From’ field when you send emails
      • Email Address  – your full email address
      • Password – your email password (forgotten passwords cannot be restored but they can be reset in your control panel)
      • Select Create

      yosemite-add-mail

    5. A pop up will appear that reads ‘Account must be manually configured’. Select Next
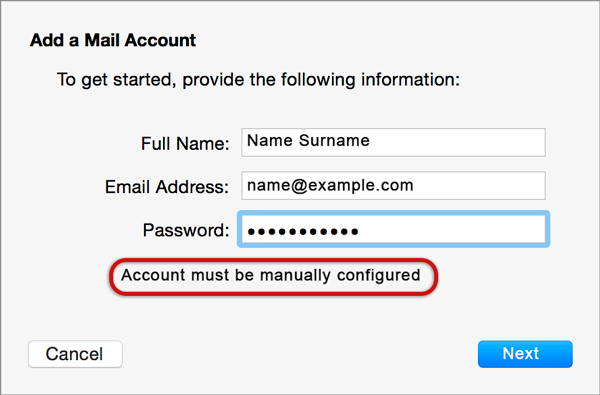
      yosemite-add-mail-2

      Incoming Mail Server Info

    6. Enter these details:
      • Account Type– Select POP or IMAP (this guide defaults to IMAP)
      • Mail Server – has mail. before the domain name e.g. mail.example.com*
      • User Name– your full email address
      • Password– your email password (forgotten passwords cannot be restored but they can be reset in your control panel)
      • Select Next

      Outgoing Mail Server Info

      • SMTP Server –has mail before the domain name e.g. mail.example.com*
      • User Name– your full email address
      • Password – your email password (forgotten passwords cannot be restored but they can be reset in your control panel)
      • Select Create

    * Note: In isolated cases mail.domain (e.g. mail.example.com) won’t work. In these cases you will need to use the server name instead.

    You have completed your account setup.  Your Mac mail program should now be set to send and receive email. We recommend sending a test email.
  • Set up email in OS X El Capitan

    Set up email in OS X El Capitan

    User Name :
    Your user name is your full email address
    Incoming Server : mail.yourdomain.co.za
    Ports : IMAP 993 / POP 995
    Outgoing Server : mail.yourdomain.co.za
    Port : SMTP 465
    Encryption: SSL/TLS

    Check your password by browsing to Webmail and trying to log in. If you aren’t able to log in, then you have the incorrect password. Forgotten passwords can be reset in your control panel – you will need to get your domain or web administrator to update it for you if you don’t have control panel access.

    Add a new email account

    1. Launch Mail
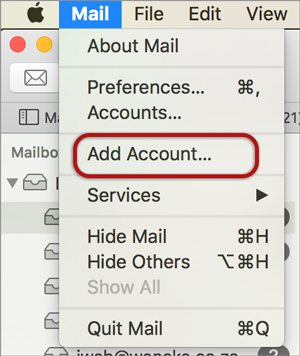
    2. From the toolbar at the top, select Mail and then Add Account…

      mac-add-acount
    3. Select Other Mail Account…
      mac-othe-mail
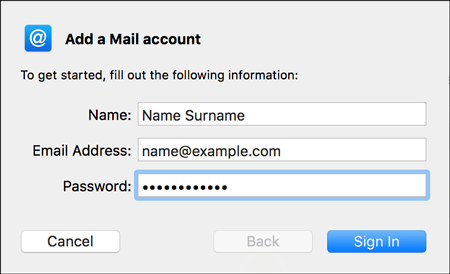
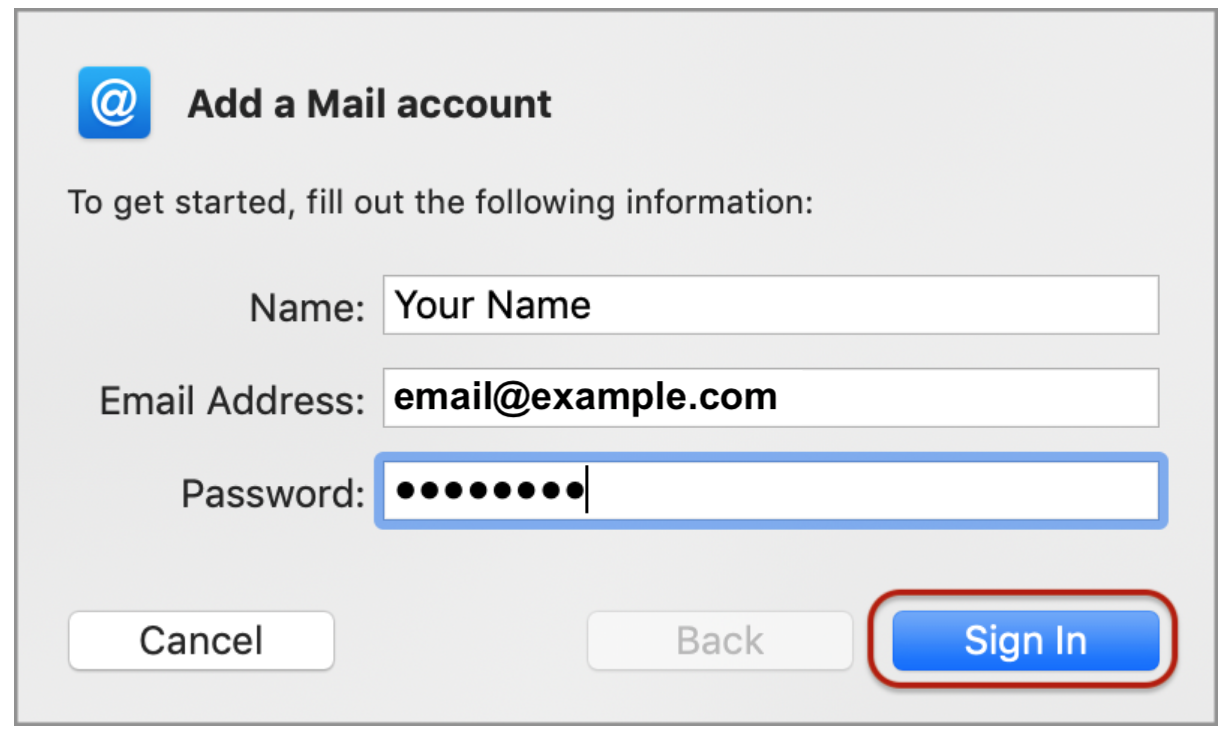
    4. Enter your details
      • Name (which will appear in the ‘From’ field when you send emails)
      • Email Address
      • Password  (Forgotten passwords can be changed in your control panel)
      • Select Sign In

      mac-add-account

    5. Complete the settings as follows:
      • User Name is the full email address
      • Account Type is IMAP or POP according to preference (IMAP is the default)
      • Incoming Mail Server has mail. before the domain name e.g. mail.example.com*
      • Outgoing Mail Server has mail. before the domain name e.g. mail.example.com*
      • Select Sign In

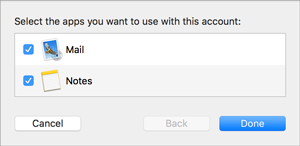
    6. Select any apps > Done
      select-apps
    7. From the toolbar at the top, select Mail and then Preferences…
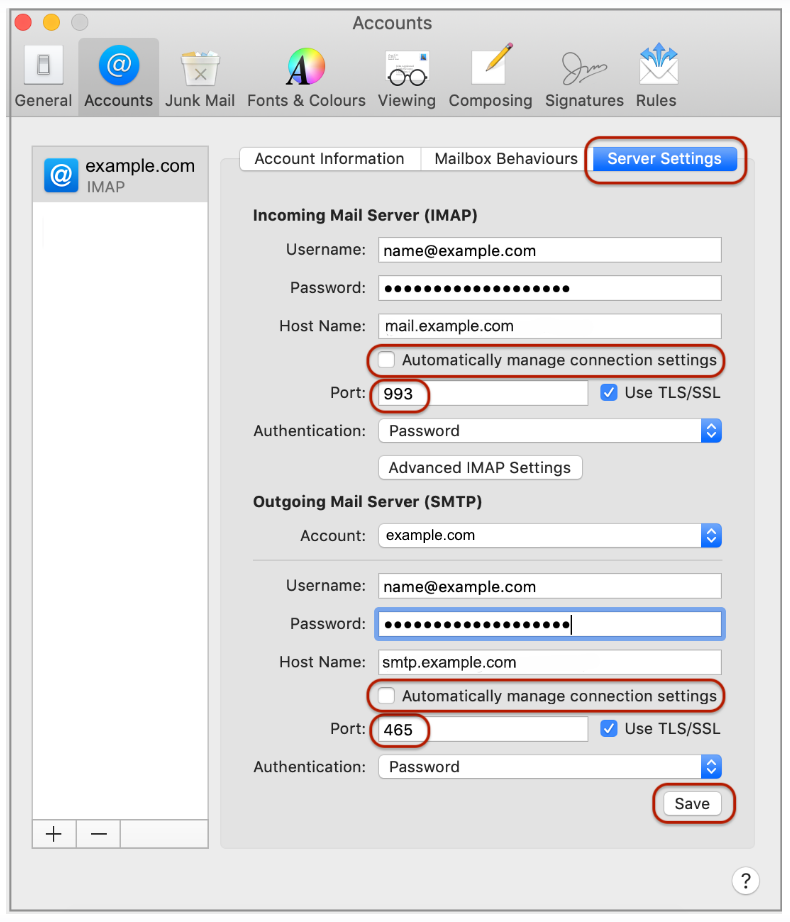
    8. Select Server Settings:
    9. Complete the Incoming Mail Server settings:
      • Untick Automatically manage connection settings
      • Fill in the correct Port number – Port 993 for IMAP/ Port 995 for POP
      • Ensure Use SSL/TLS is ticked
    10. Complete the Outgoing Mail Server settings:
      • Untick Automatically manage connection settings
      • Fill in the correct Port number – 465 for SMTP
      • Ensure Use SSL/TLS is ticked
    11. * Note: In isolated cases mail.domain (e.g. mail.example.com) won’t work. In these cases you will need to use the server name instead
    12. Your Mail account is now set up with SSL. You will see your new account in the list with any other mail accounts.
  • Set up email in macOS Sierra, Mojave or Catalina

    Replace example.com with your domain name.

    To add a new email account

    1. Launch Mail
    2. From the toolbar at the top, select Mail and then Add Account…


    3. Select Other Mail Account…
    4. Select Continue
    5. Enter the required details and select Sign In

      • Name – the name that will appear in the ‘From’ field when you send emails
      • Email Address  – your full email address
      • Password – your email password (forgotten passwords cannot be restored but they can be reset in your Control Panel)
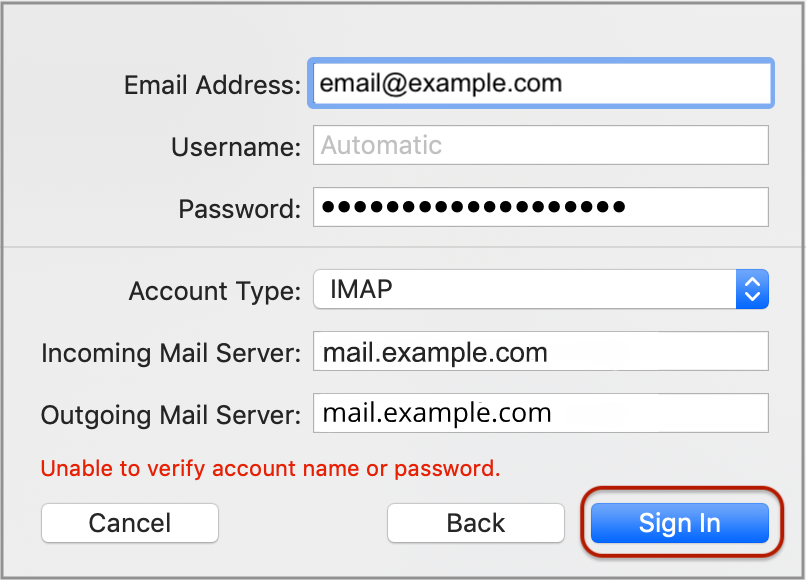
    6. A message will appear that reads ‘Unable to verify account name or password’. This is because Mail has not used your full email address as the Username.  Your email address and password may already be populated. Complete the remaining fields as follows:
      • Username– your full email address
      • Account Type – from the dropdown, select POP or IMAP (this guide defaults to IMAP)
      • Incoming Mail Server – has mail. before the domain name e.g. mail.example.com*
      • Outgoing Mail Server – has mail. before the domain name e.g. mail.example.com*
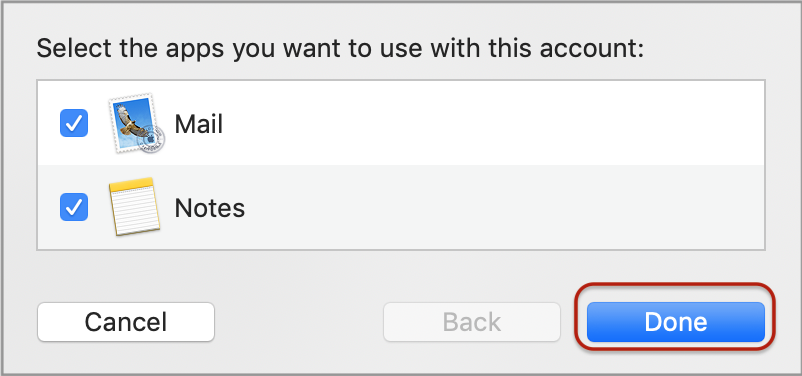
    7. Select Sign In.  A pop up will appear that reads ‘Select the apps you want to use with this account:’. Select Done

    Your new email account is now set up. You will see your new account in the list with any other mail accounts.

  • How to set up email in Windows 8 Mail

    How to set up email in Windows 8 Mail

    User Name :
    Your user name is your full email address
    Incoming Server : mail.yourdomain.co.za
    Ports : IMAP 993 / POP 995
    Outgoing Server : mail.yourdomain.co.za
    Port : SMTP 465
    Encryption: SSL/TLS

    Replace example.com with your domain name

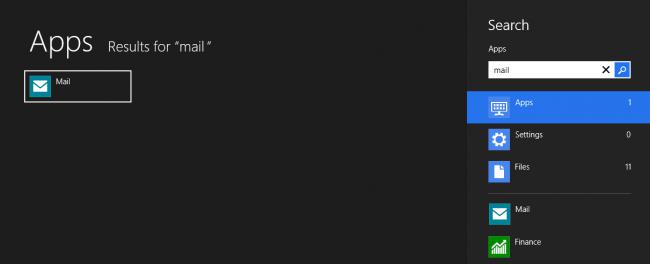
    1. Search for Mail and launch the Mail app
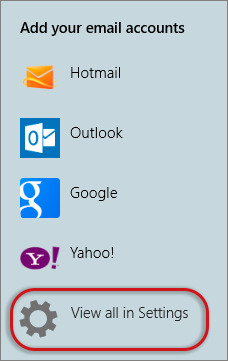
    2. Select View all in Settings from the bottom left of the screen
      Mail-Add-Email-Accounts
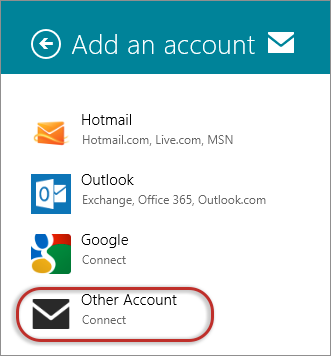
    3. Select Other Account
      add-account
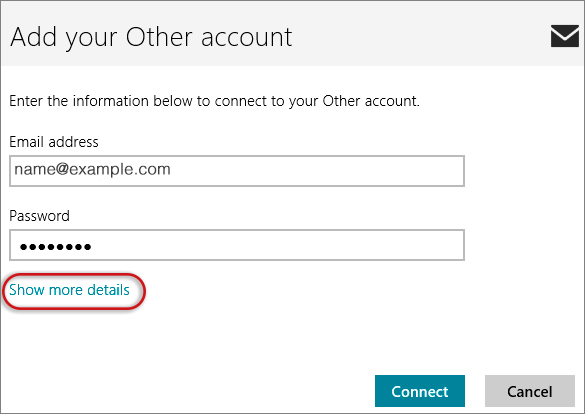
    4. Then select Show more detailswindows-8-add
    5. Add your information
      • Username is the full email address
      • Password – forgotten passwords can be reset in your control panel
      • Incoming (IMAP) email server starts with mail. followed by your domain name e.g. mail.example.com*
        • Port is 993
        • Incoming server requires SSL  is ticked
      • Outgoing (SMTP) email server starts with mail. followed by your domain name e.g. mail.example.com*
        • Port is 465
        • Incoming server requires SSL  is ticked
      • The last 2 checkboxes are ticked
      • Connect

    6. Your Windows 8 Mail program should now be set up to send and receive mail.

    * Note: In isolated cases mail.domain (e.g. mail.example.com) won’t work. In these cases you will need to use the server name instead

  • How to set up email in Windows 10 Mail

    This guide takes you step-by-step through the process of setting up a new email account in Windows 10 – both the Desktop and Mobile versions.
    Replace example.com with your domain name

    1. Launch Windows Mail
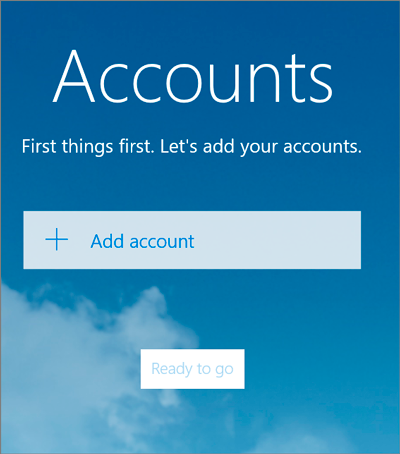
    2. Add Account

      10--a400
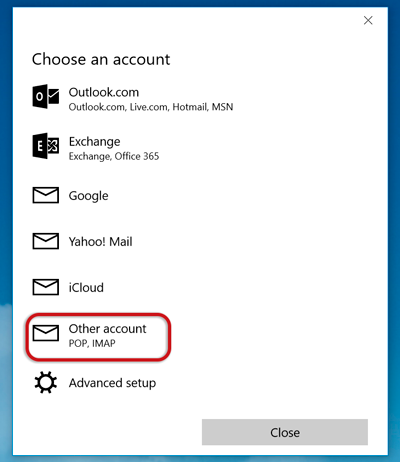
    3. Choose Other account 

      windows10-b

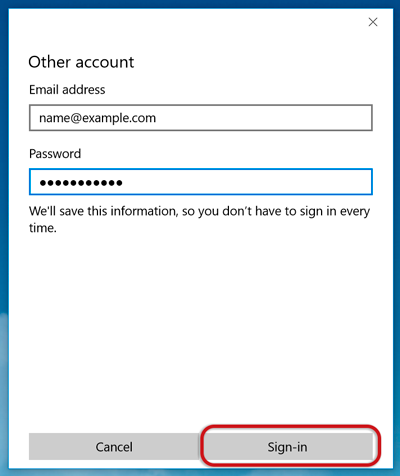
    4. Insert your Email address and Password (forgotten passwords can be reset in your Control Panel)
      • Click Sign-in

      windows10-c

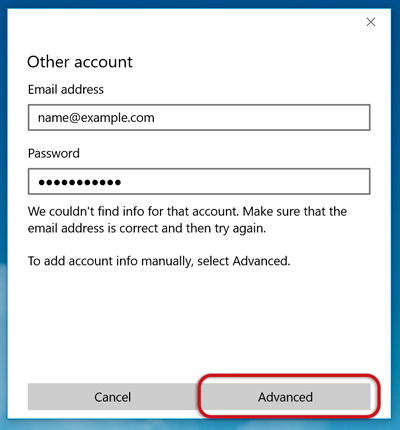
    5. Click Sign-in repeatedly until it changes to Advanced

      windows10-d
    6. Provide the Account information
      • Incoming email server starts with mail. followed by your domain name e.g. mail.example.com*
      • Account type is IMAP4
      • User name is the full email address
      • Password is your mailbox password
      • Outgoing (SMTP) mail server starts with mail. followed by your domain name e.g. mail.example.com*
      • Tick all blocks
      • Sign-in

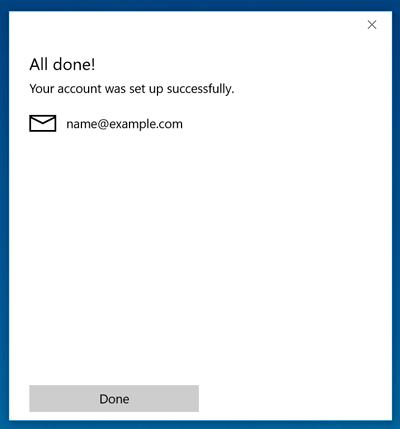
    7. All done!


    windows10-f

  • How to set up email in Windows Live Mail

    This guide takes you step-by-step through the process of setting up a new email account in Window Live Mail.

    Replace example.com with your domain name

    1. Launch Windows Live Mail
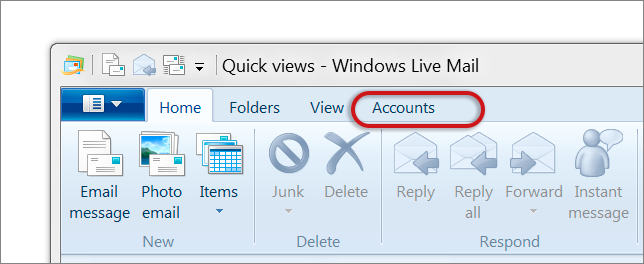
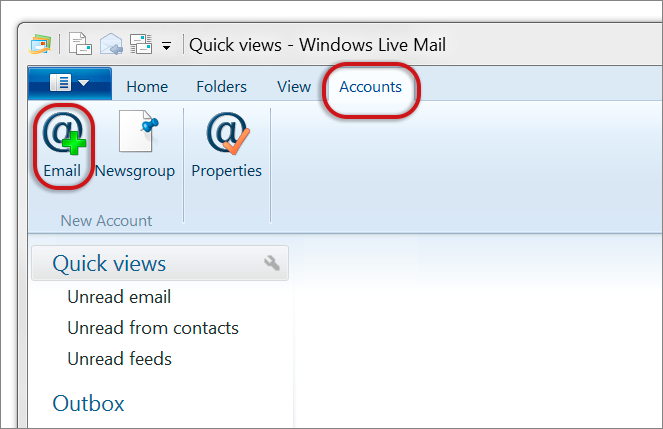
    2. Select Accounts from the top menu bar

    Windows Live Mail setup

    3. Select Email

    liveB

    4. Enter the email address and password (forgotten passwords can be reset in your Control Panel) > Next

    5. Configure server settings:

    Incoming server information:

    • Server type is POP or IMAP
    • Server address starts with mail. followed by the domain name e.g. mail.example.com*
    • Requires a secure connection (SSL) is ticked
    • Port is 993 for IMAP or 995 for POP
    • Authenticate using Clear text
    • Logon user name is the full email address

    Outgoing server information:

    • Server address starts with mail. followed by the domain name e.g. mail.example.com*
    • Port is 465
    • Requires a secure connection (SSL) is ticked
    • Requires authentication is ticked

    Next

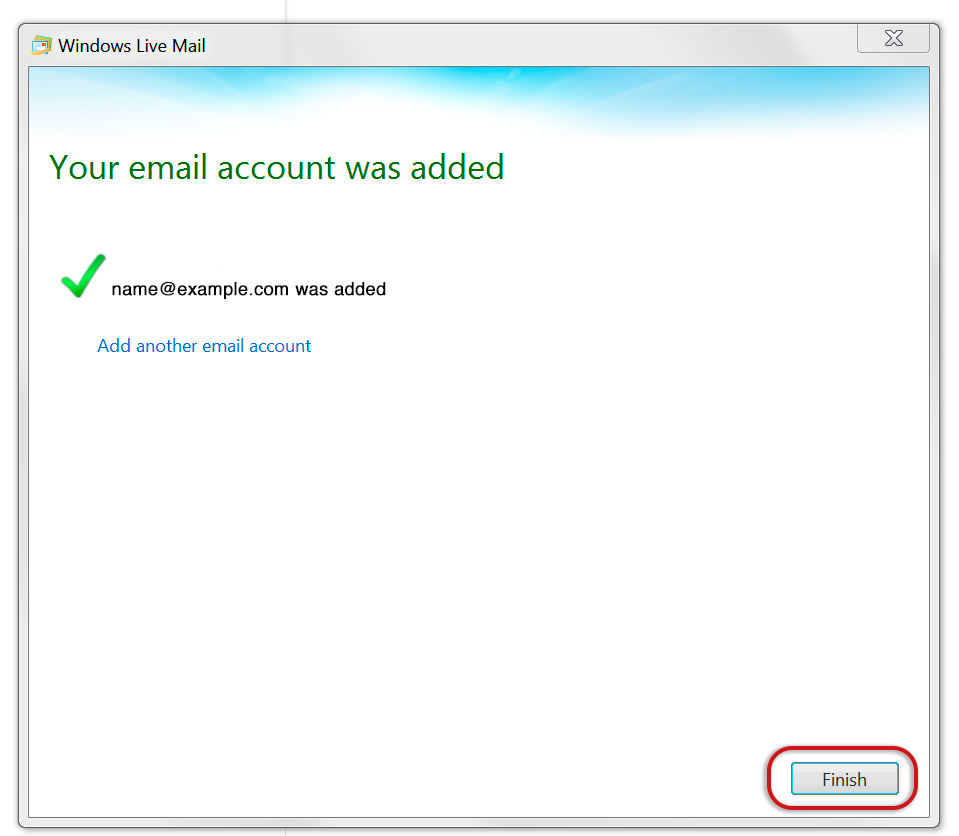
    6. Once prompted, you can complete the setup by clicking Finish.

    live Finish

  • How to set up email in Thunderbird

    This guide takes you step-by-step through the process of setting up a new email account in Thunderbird.

    Replace example.com with your domain name

    Automatic Account configuration

    A new email account setup with Thunderbird is quick and easy using Automatic Account configuration. 

    However, reasons to rather use Manual Configuration are:

    • if you prefer POP, as this automatic configuration defaults to IMAP 
    • if this is a new hosting account and domain propagation has not completed


    1. Launch Mozilla Thunderbird
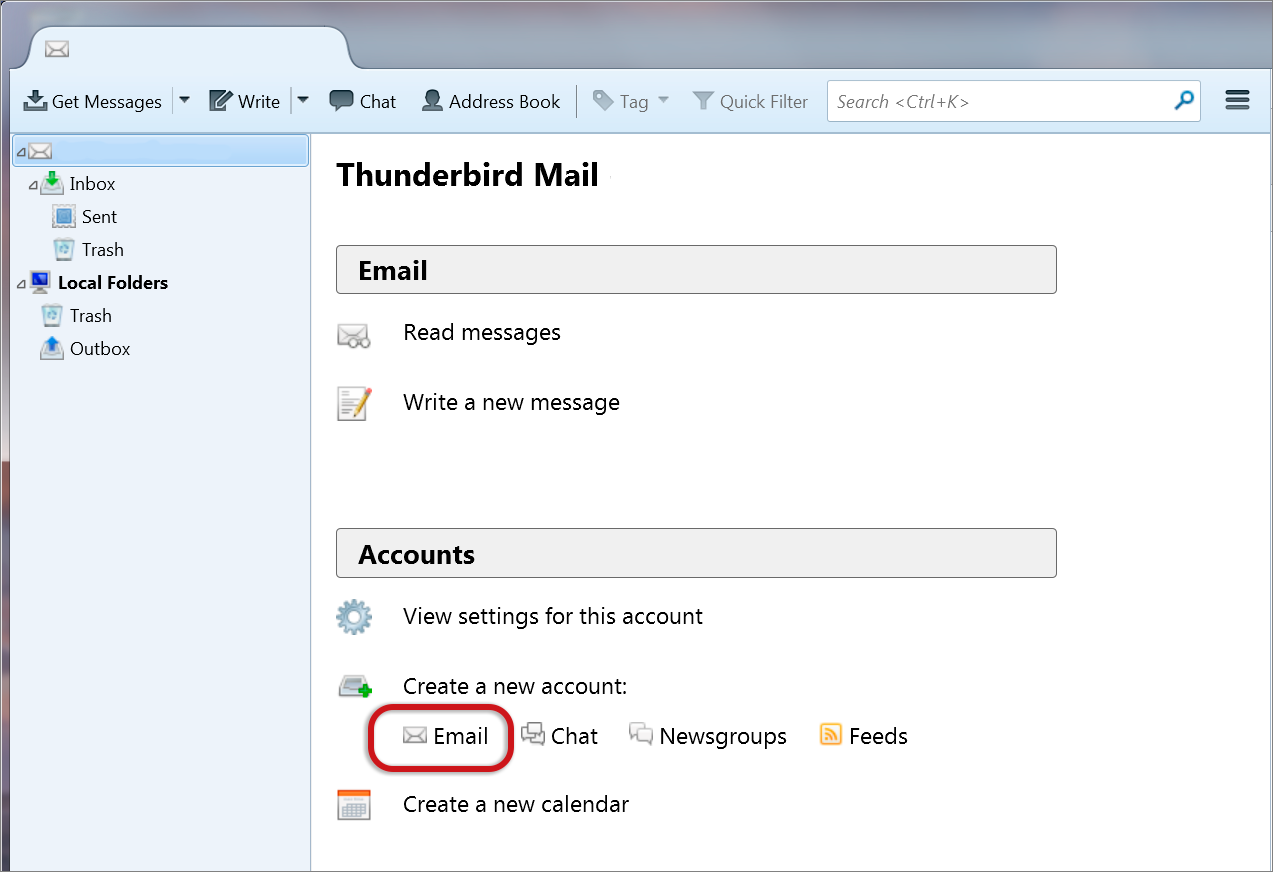
    2. Choose Create a new account > Email 

      Thunderbird email setup


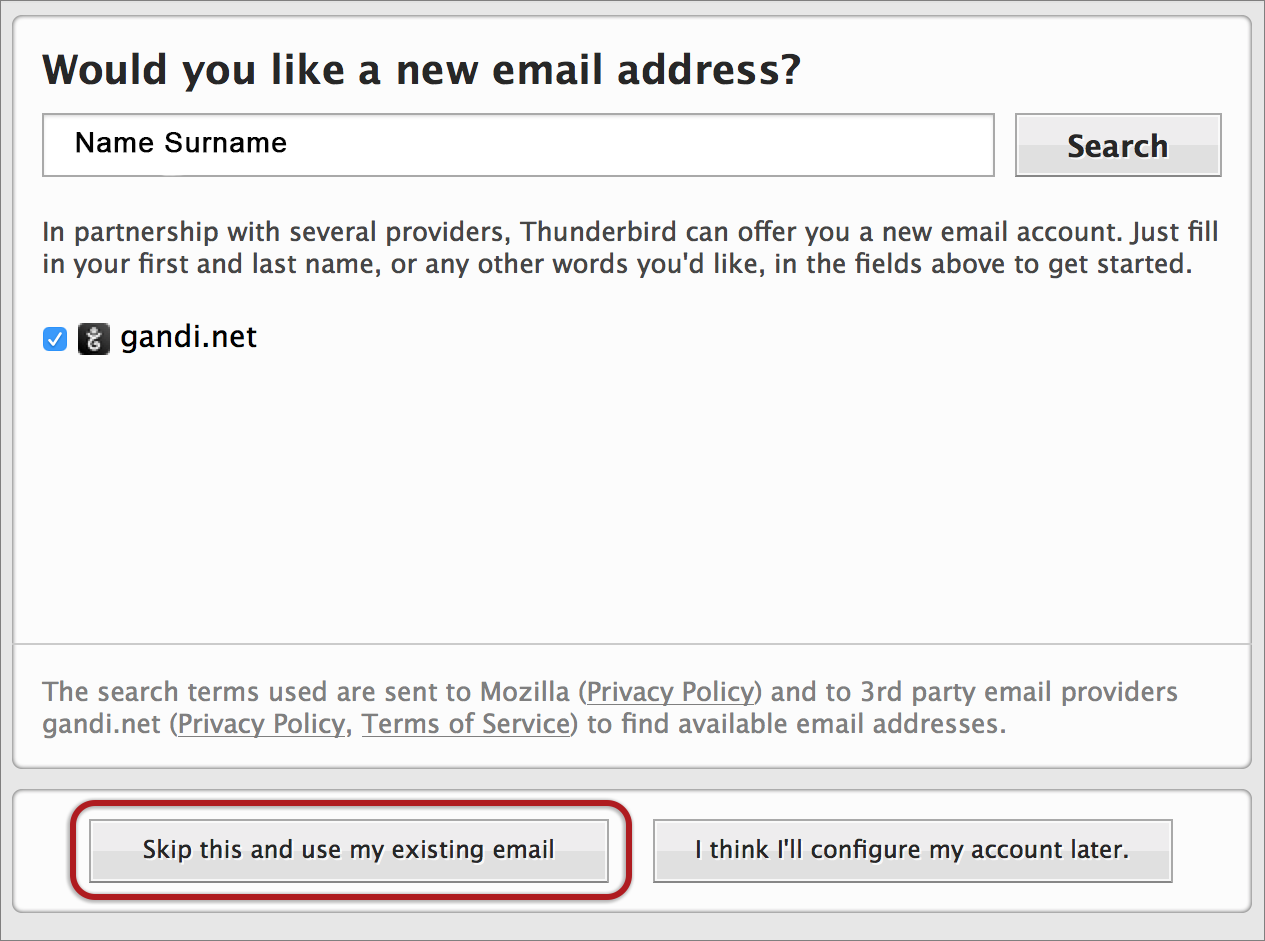
    3. Choose Skip this and use my existing emailthnderbird mac skip

       Mail Account Setup

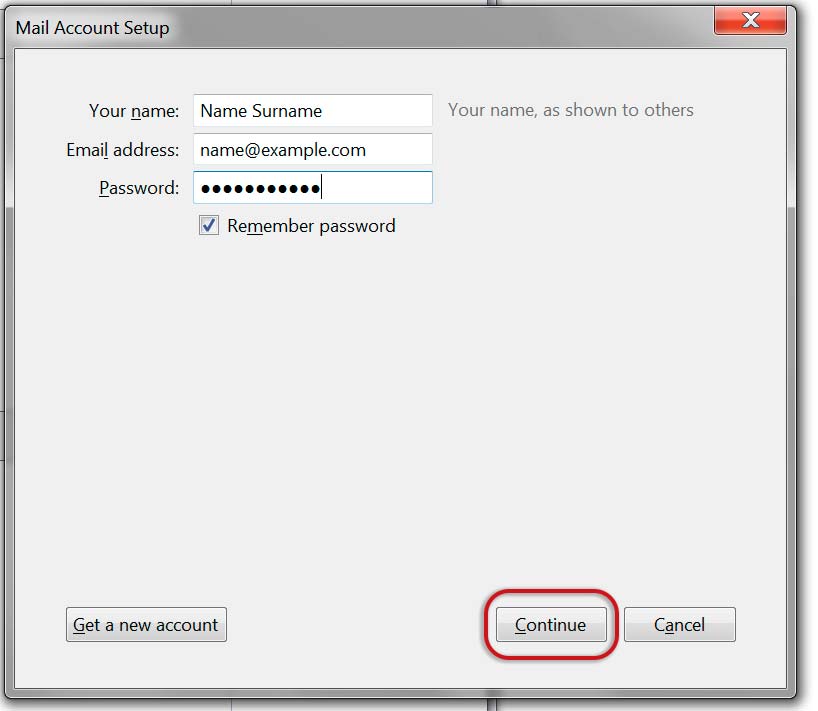
    4. Enter the following details:
      • Your Name (which will appear in the “From” field in your emails)
      • Email address
      • Password  (forgotten passwords can be reset in your control panel)
      • > Continue

      account-setup-new

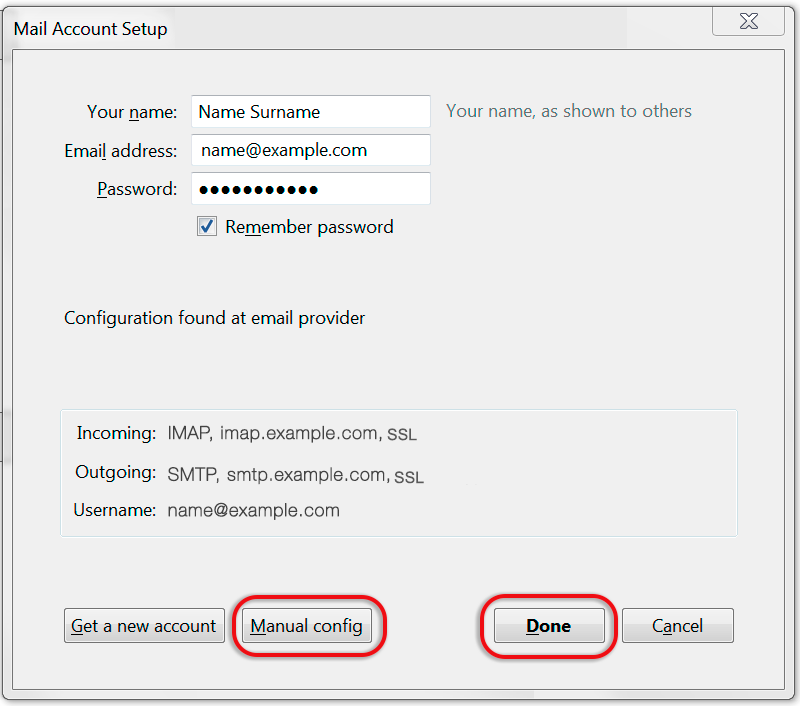
    5. Thunderbird will now automatically check your email settings.
    6. If your settings are found, then your setup is complete and you can press Done. If your settings are not found, click the Manual config button and continue as below

      ♦ Manual configuration

      Follow the Automatic configuration above, and then choose Manual config.

    7. Ensure that your settings are correct as below (these are the default settings – replacing with your own name and domain).
      • Choose POP or IMAP
        • IMAP: Incoming port 993, Outgoing 465 (as below)
        • POP : Incoming 995, Outgoing 465
      • Ensure that the Username is the full email address.
      • If you don’t know your password, reset it in your Control Panel
      • For new hosting accounts, temporarily use the IP address  instead of the Incoming & Outgoing mail servers.
      • SSL is SSL/TLS
      • Authentication is Normal password.

    8. Click Done. Your email setup is complete.
  • How to set up email in Outlook 2007

    This guide takes you step-by-step through the process of setting up a new email account in Outlook 2007.

    Replace example.com with your domain name

    Auto Account Setup (recommended)

    Setting up a new email address in Outlook is quick and easy using the Auto Account Setup option. However, reasons to rather use Manual Setup are:

    • if you prefer POP, as this automatic configuration defaults to IMAP 
    • if this is a new hosting account and domain propagation has not completed

    Add a new email account

    1. Launch Outlook 2007
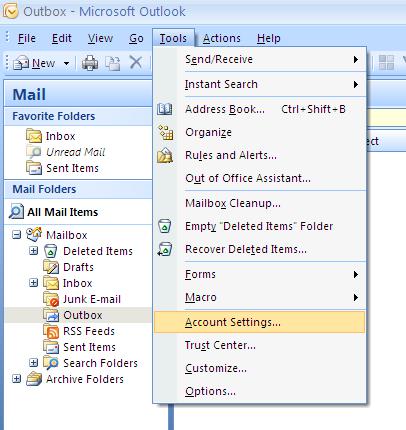
    2. Select Tools from the top menu bar, then Accounts Settings

    Create new account

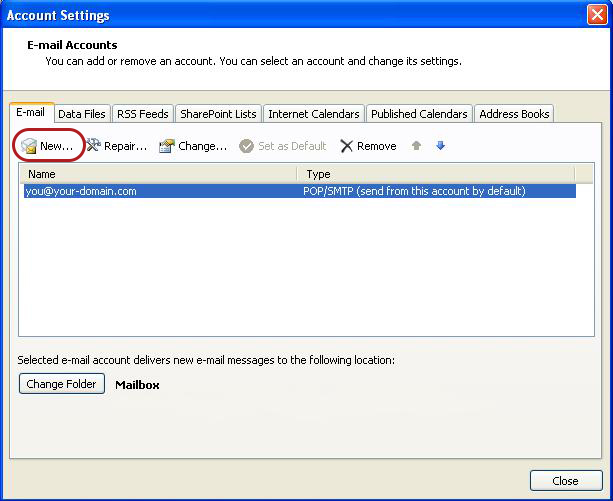
    3. On the Account Settings screen, click New on the E-mail tab

    oulook2007create_new_account2

    In the Add New Account box, choose Auto Account Setup 

    Enter your details under E-mail Account > Next.

    • You can safely ignore any warning messages.
    • If you’ve lost your password – change it in your Control Panel

    6. Outlook will now automatically configure your account as an IMAP account with all the correct settings.

    7. Finish > Close

    That’s it!

    If this option fails for some reason, try the Manual Account Setup below

    Manual Account Setup

    If you prefer to use POP  you will need to set up the account manually:

    Add a new email account

    1. Launch Outlook 2007
    2. Select Tools from the top menu bar, then Accounts Settings

    Create new account

    3. On the Account Settings screen, click New on the E-mail tab

    oulook2007create_new_account2

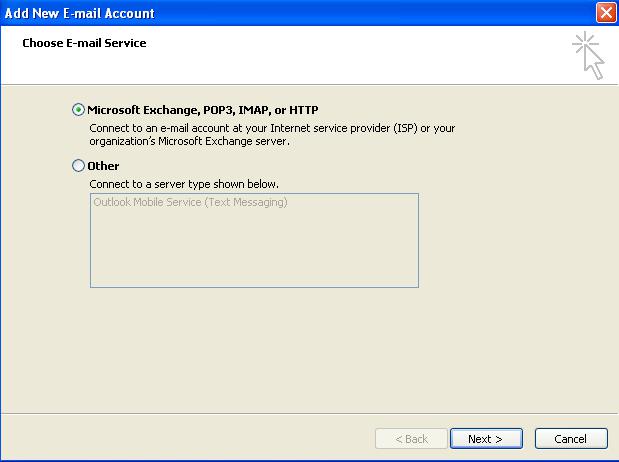
    Choose e-mail service

    4. Select Microsoft Exchange, POP3, IMAP or HTTP and click Next

    Account Setup

    5. Tick the Manually configure server settings or additional server types checkbox and click Next

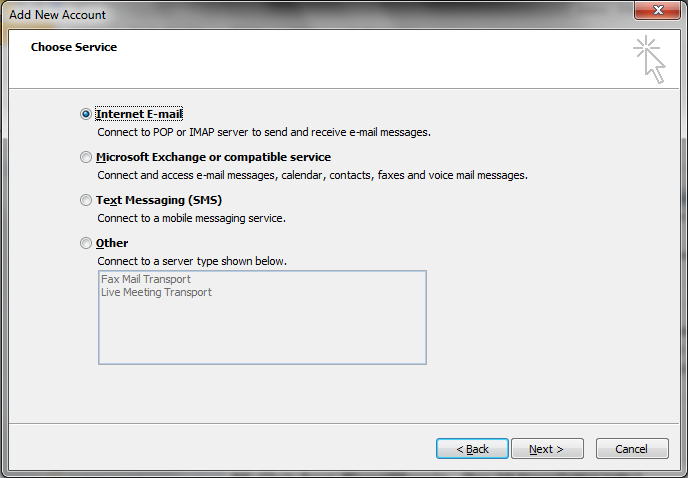
    Select Internet Email

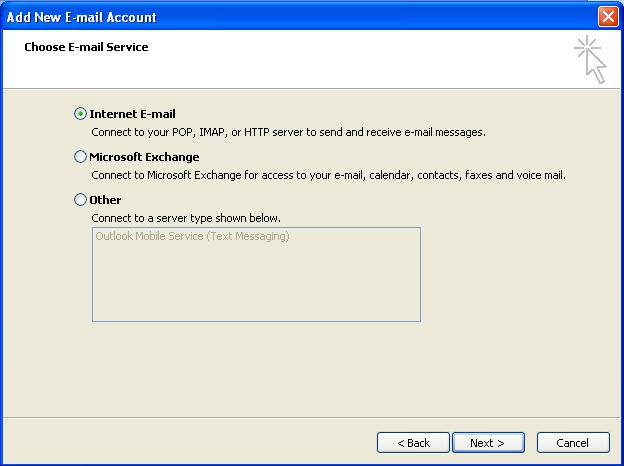
    6. Select Internet E-mail and then click Next

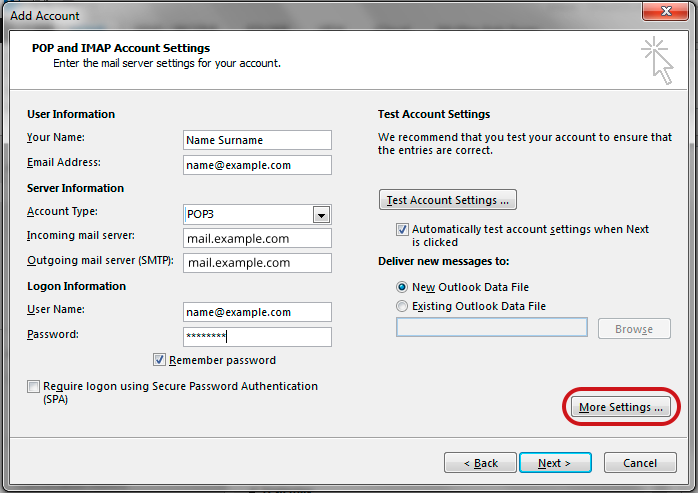
    7. Email settings

    • Account type: POP or IMAP
    • Incoming mail server: mail. followed by your domain name e.g. mail.example.com*
    • Outgoing mail server (SMTP): mail. followed by your domain name e.g. mail.example.com*
    • User Name:  ensure you fill in your entire email address as the username
    • For new hosting accounts, use the IP address instead of the Incoming & Outgoing mail servers
    • Select the More Settings… button.

    outlook2007 settings

    Outgoing Server Settings

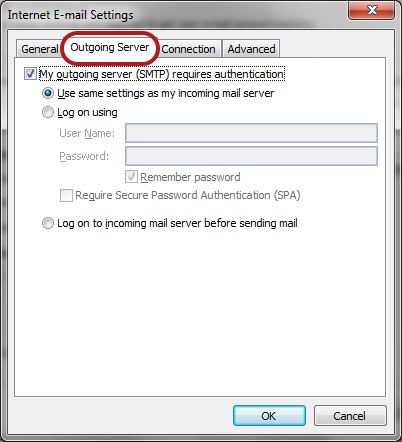
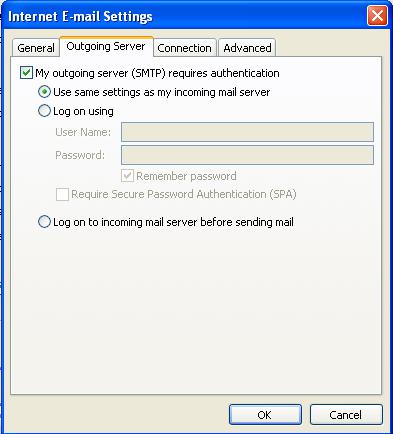
    8. Click on the Outgoing Server tab and ensure that the My outgoing server (SMTP) requires authentication checkbox is selected, as well as Use same settings as my incoming mail server

    Advanced Settings

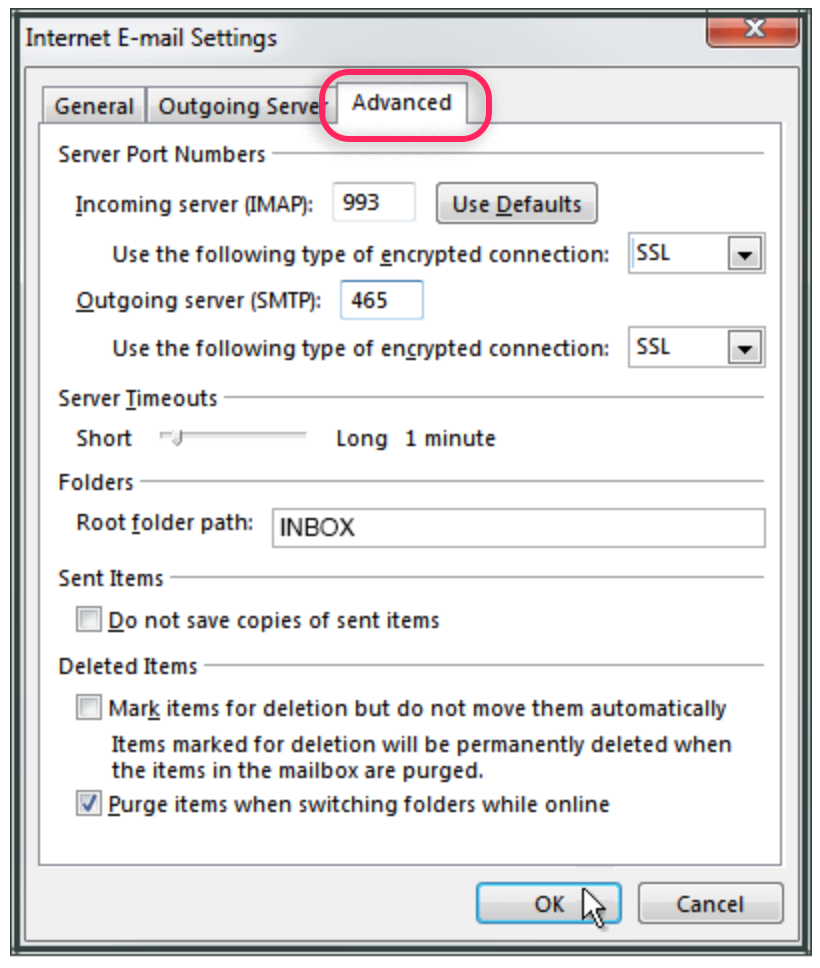
    9. Select the Advanced tab

    •  Incoming server: 995 (POP) or 993 (IMAP)
    • Use the following type of encrypted connection: SSL
    • Outgoing server (SMTP): 465
    • Use the following type of encrypted connection: SSL

    10. Click OK to save these settings
    11. Click Next and Finish

    Your Outlook mail program should now be set up to send and receive mail.

  • How to set up email in Outlook 2010

    This guide takes you step-by-step through the process of setting up a new Texo-hosted email account in Outlook 2010.

    Replace example.com with your domain name

    Auto Account Setup (recommended)

    Setting up a new email address in Outlook is quick and easy using the Auto Account Setup option. However, reasons to rather use Manual Setup are:

    • if you prefer POP, as this automatic configuration defaults to IMAP 
    • if this is a new hosting account and domain propagation has not completed

    1. Launch Outlook 2010

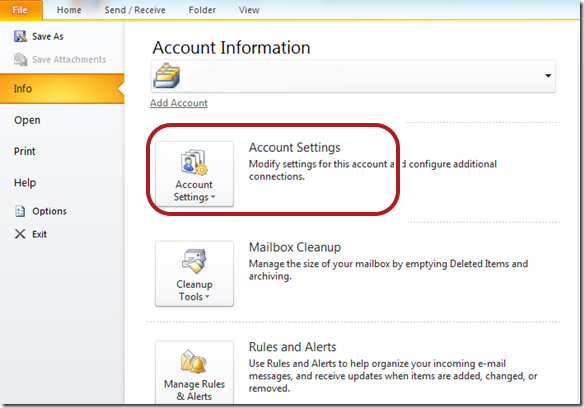
    2. Select File from the top menu bar and then Info and Account Settings

    Outlook 2010 email setup

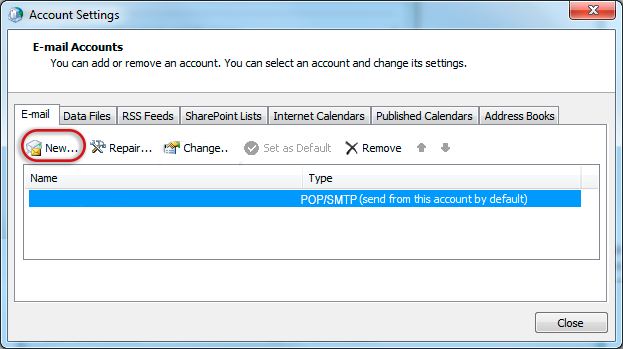
    3. On the Email tab, Select New

    outlook2010-new

    4. Click to select the Internet E-mail or Email account option > Next

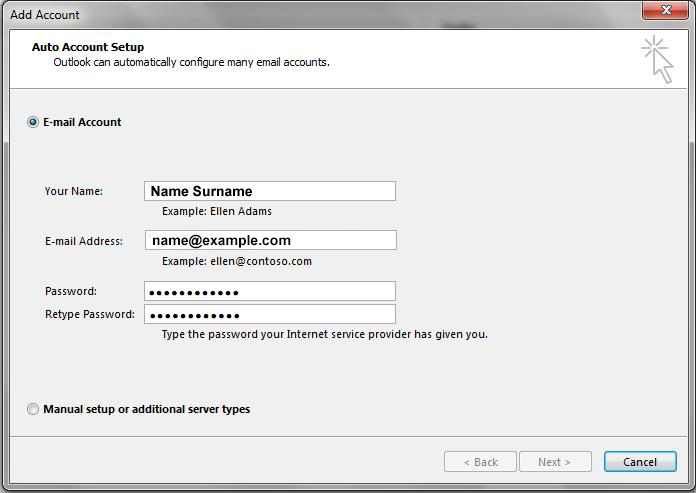
    5. In the Add Account box

    Enter your details under E-mail Account

    • If you’ve lost your password – change it in your Control Panel
    • Next

    create-new-account

    6. Outlook will now automatically configure your account as an IMAP account with all the correct settings.

    7. Finish > Close

    That’s it!

    If this option fails for some reason, try the Manual Account Setup below or refer to our Outlook troubleshooting guide.

    Manual Account Setup

    If you prefer to use POP  you will need to set up the account manually:

    1. Launch Outlook 2010

    2. Select File from the top menu bar and then Info and Account Settings

    3. On the Auto Account Set-up screen, select Manual setup or additional server types. > Nextoutlook2013-manual

    Choose email service

    4. Select Internet E-mail, then select Next

    outlook2010 internet email

    Email settings

    5. Enter all the relevant details:

    • Account type: POP or IMAP
    • Incoming mail server: mail. followed by your domain name e.g. mail.example.com*
    • Outgoing mail server (SMTP): mail. followed by your domain name e.g. mail.example.com*
    • User Name:  ensure you fill in your entire email address as the username
    • For new hosting accounts, use the IP address instead of the Incoming & Outgoing mail servers
    • Select the More Settings… button.

    outlook-manual-setup

    Outgoing Server Settings

    6. Select the Outgoing Server tab and ensure that the My outgoing server (SMTP) requires authentication check box is selected, as well as Use same settings as my incoming mail server.

    mso2007-outgoing server copy

    Advanced Settings

    7. Select the Advanced tab

    8. Check these settings:

    • The Incoming server port for IMAP is 993 and POP is 995
    • Use the following type of encrypted connection is SSL
    • The Outgoing server (SMTP) port is set to 465
    • Use the following type of encrypted connection is SSL

    9. Select OK, then Next and Finish.

    10. Your Outlook mail program should now be set up to send and receive mail.

  • How to set up email in Outlook 2013

    This guide takes you step-by-step through the process of setting up a new email account in Outlook 2013.

    Replace example.com with your domain name

    Auto Account Setup (recommended)

    New email account set up with Outlook is quick and easy using the Auto Account Setup option. However, reasons to rather use Manual Setup are:

    • if you prefer POP, as this automatic configuration defaults to IMAP 
    • if this is a new hosting account and domain propagation has not completed
    1. Launch Outlook
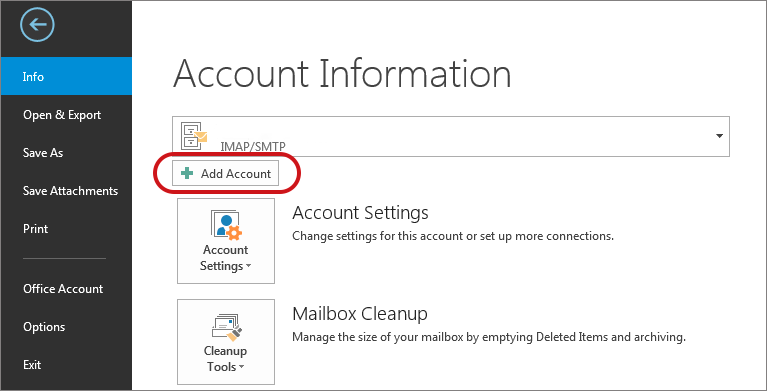
    2. Select File on the top left menu bar
    3. Select the Add Account button in the middle of the screenoutlook2013-add-account1
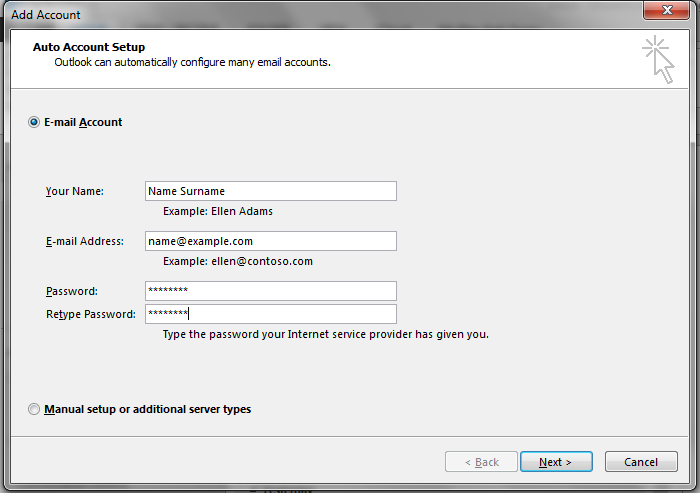
    4. Enter your details on the Auto Account Set-up screen > Next
      • If you’ve lost your password – change it in your Control Panel.

      outlook 2013 auto account setup

    5. Outlook will now automatically configure your account as an IMAP account with all the correct settings.

    That’s it!

    If this option fails for some reason, try the Manual Account Setup below or refer to our Outlook troubleshooting guide.

    Manual Account Setup

    If you prefer to use POP , or your domain has not propagated yet, you will need to set up the account manually:

    1. Launch Outlook, choose File > Account Settings > Add Account (as above)
    2. Choose Manual Setup or additional server types > Nextoutlook2013-manual
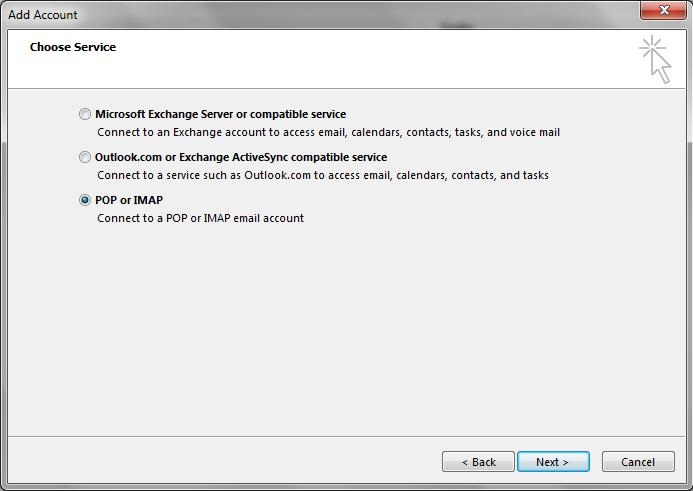
    3. Select POP or IMAP > Next

      Account settings

    4. Enter all the relevant details:
      • Account type: POP or IMAP
      • Incoming mail server: mail. followed by your domain name e.g. mail.example.com*
      • Outgoing mail server (SMTP): mail. followed by your domain name e.g. mail.example.com*
      • User Name:  ensure you fill in your entire email address as the username
      • For new hosting accounts, use the IP address instead of the Incoming & Outgoing mail servers
      • Select the More Settings… button.

      outlook-manual-setup

      Check Outgoing Server settings

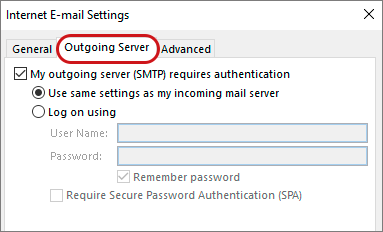
    5. Select the Outgoing Server tab
      • Ensure that the My outgoing server (SMTP) requires authentication checkbox is ticked
      • Ensure that you have selected Use same settings as my incoming mail server

      outlook2013-outgoing-server

      Check Advanced SMTP settings

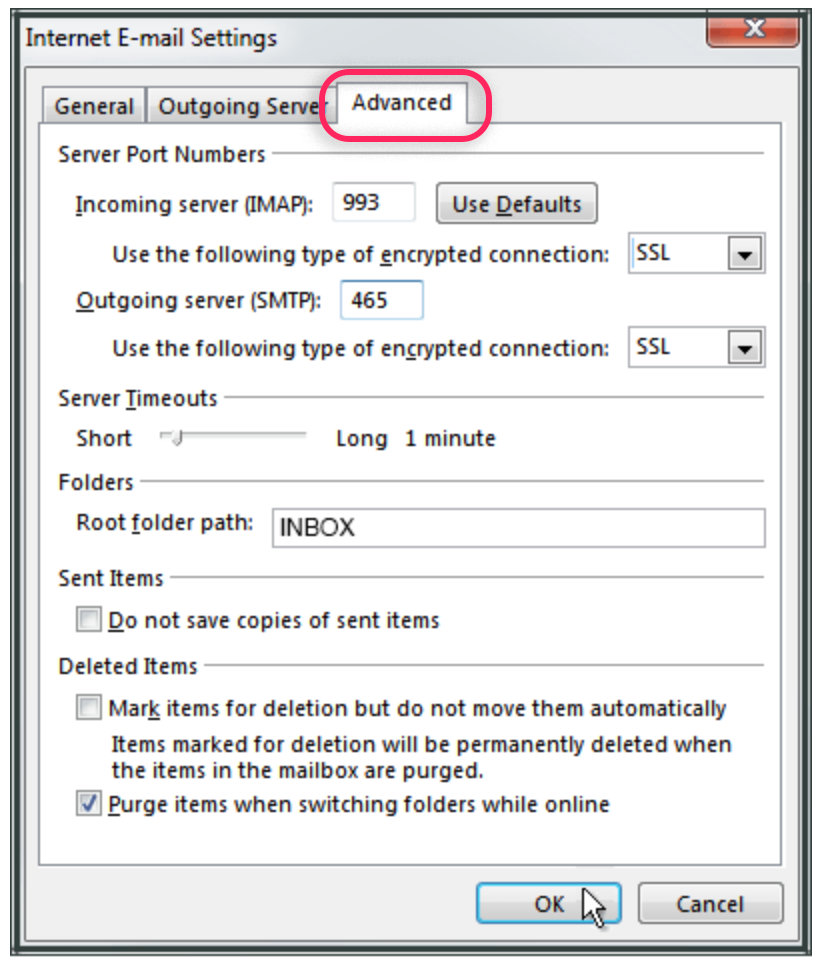
    6. Select the Advanced tab and ensure that your settings are as below for either IMAP or POP:
      •  Incoming server: 995 (POP) or 993 (IMAP)
      • Use the following type of encrypted connection: SSL
      • Outgoing server (SMTP): 465
      • Use the following type of encrypted connection: SSL
    7. Click OK and then Next.
    8. Let the test complete and then click Close

      outlook2013-test-complete

    You’re all set!